Friday, 30 October 2015

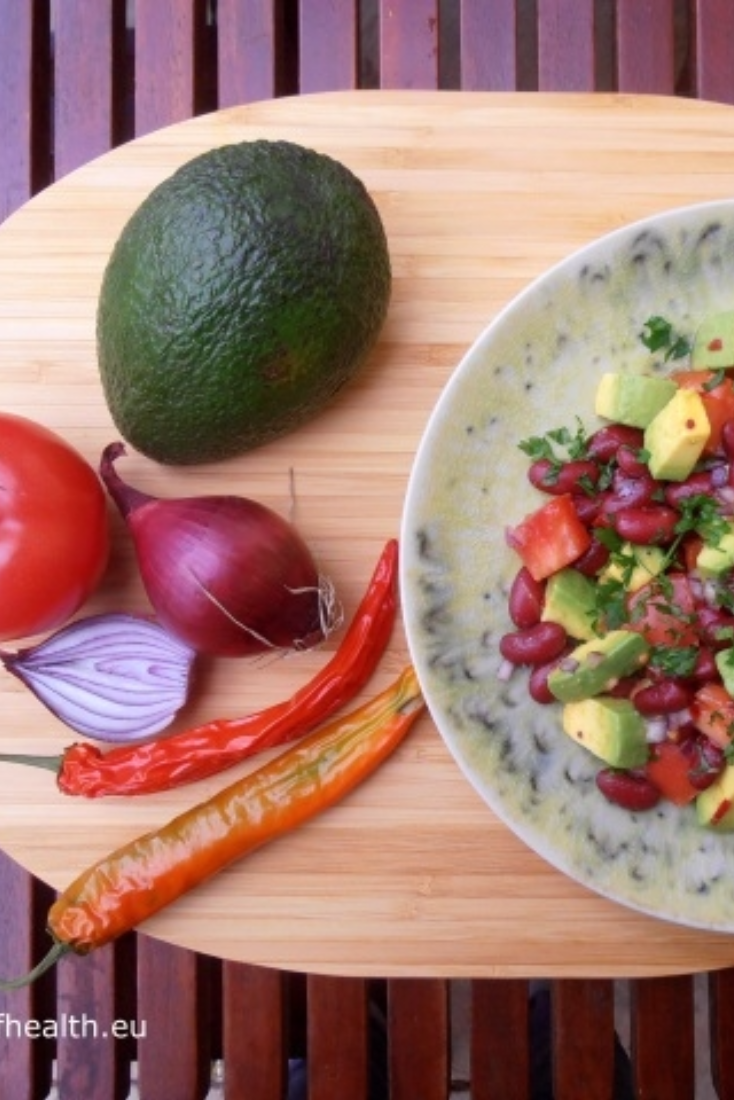
Mexican Salad with Avocado, Tomato and Red Beans [vegan]


Mexican salad, tomato, avocado, salad, guacamole, red beans, vegetarian

I called this salad Mexican but in truth it could also be called Guacamole Salad because it uses more or less the same ingredients as the ones that are required to make this well-known dip. However – to make it more filling so it can be a proper, nutritious lunch option - I also added red beans.

Even though I know that eating salads are more associated with spring and summer, this one is still a good option for autumn or even winter, since the addition of red chilies (the amount of which you can always adjust) will surely warm you up ;)

INGREDIENTS (for 4 portions):

2 big tomatoes, cut into cubes,
2 avocados, cut into cubes,
1 can of red beans,
1 small red onion, thinly chopped,
chopped coriander,
red chili, thinly chopped (the amount used depends on you but it is better to start with less at the beginning and then slowly add),

Dressing:
2 tbsp lime juice,
3 tbsp olive oil,
Salt and pepper.

METHOD:
  1. Put all the salad ingredients to a bowl.
  2. Make the dressing by mixing the ingredients.
  3. Pour the dressing over the salad, season and stir.
Mexican salad, tomato, avocado, salad, guacamole, red beans, vegetarian


Tuesday, 27 October 2015

Spaghetti Squash with Mushroom Sauce [vegetarian]


spaghetti squash, mushroom sauce, mushrooms, porcini, vegetarian
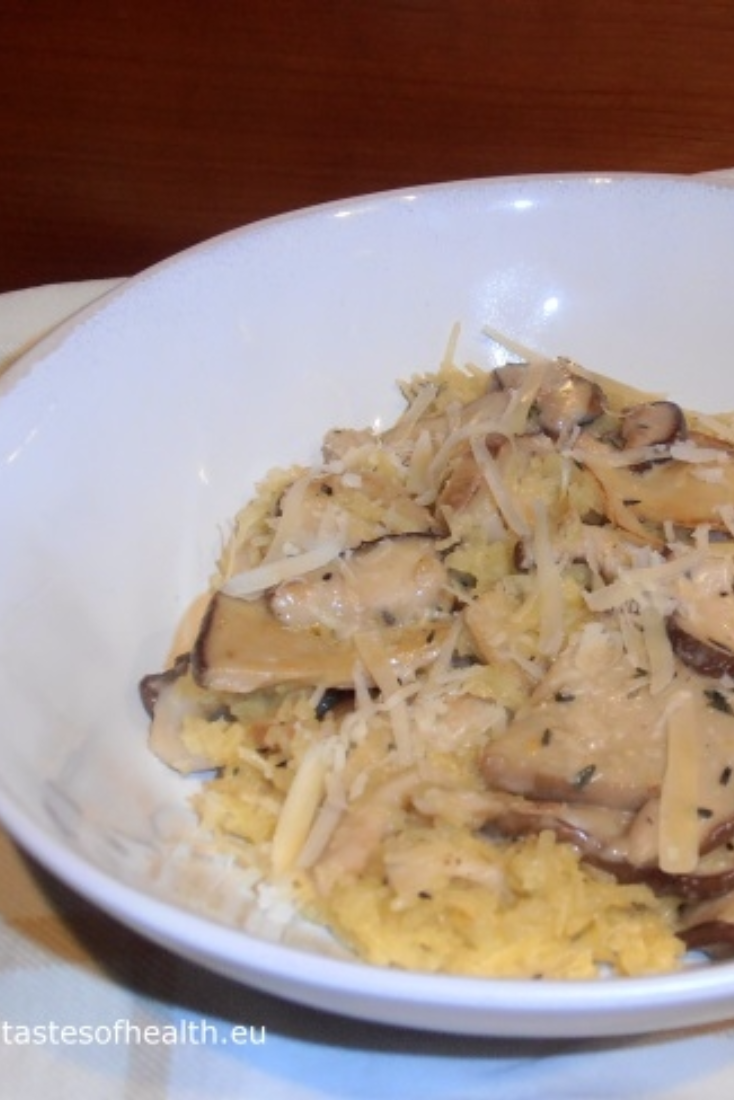
I heard and read about spaghetti squash earlier and really wanted to check myself how it tasted, and if its flesh really looked like spaghetti. So when I finally managed to buy it, I was really excited. And because it just happened that in my garden there were lots of porcini mushrooms growing (I couldn’t believe it myself how many of them we had this year – please look at the photo below), I decided to make a mushroom sauce to serve it with.

After the squash was baked, I scrapped it with two forks and did indeed end up with strands. Ok, they were not really as long as spaghetti but did look like noodles. I served them just with the mushroom sauce and grated Parmesan but the whole dish tasted really delicious.

INGREDIENTS (for 3-4 portions*):

1 spaghetti squash (approx. 1kg),
500g mushrooms (champignons or wild mushrooms),
1 tbsp butter,
1 tbsp olive oil,
200ml vegetable stock,
2 tsp dry thyme,
200ml cream (30%),
salt and pepper
grated parmesan cheese to serve.

METHOD:
  1. Heat and oven to 180 Celsius degrees (fan oven).
  2. Wash the pumpkin, cut in half and with a spoon remove its seeds.
  3. Place the halves skin side up on a baking tray covered with aluminum foil and bake for 30-40 min until the skin is soft and can easily be pierced.
  4. Clean and slice the mushrooms.
  5. On a medium heat warm up the oil and butter, add the mushrooms, raise the temperature and fry for 3 minutes.
  6. Add the stock and on a medium heat cook everything for 5 minutes.
  7. Add the thyme, cream and seasoning and cook for 1-2 minutes longer.
  8. When the pumpkin is baked through, scrap its flesh with 2 forks to get noodle-like strands.
  9. Transfer the pumpkin to the frying pan with the sauce, stir it and adjust the seasoning. You probably will have to add quite a lot of salt and pepper, as the pumpkin has not been seasoned at all.
  10. Serve with grated Parmesan.
*This dish is quite filing. But if you are planning to make it for 4 very hungry people, you may want to serve a light soup at first. 


Friday, 23 October 2015

Plum Crumble


crumble, plum, plums, plum crumble, oats, dessert, breakfast, recipe, recipes, healthy

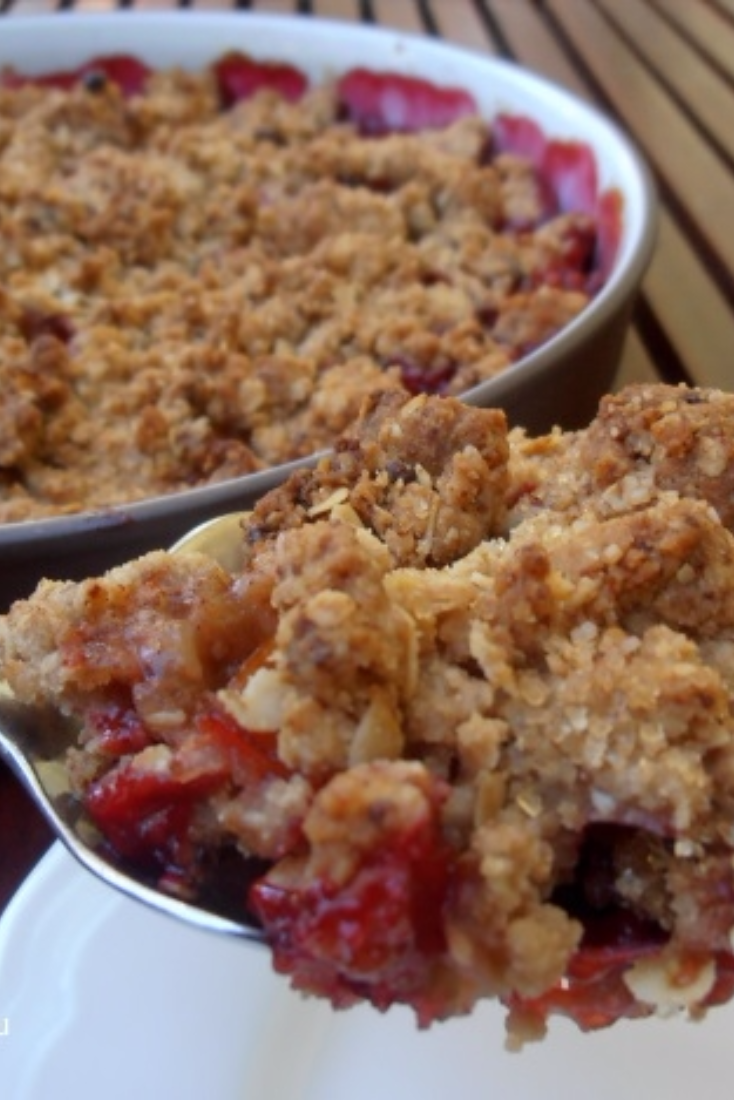
When I was a child one of my favorite autumn dishes were knedels (a type of dumplings) stuffed with plums and served with cream that my grandmother used to make. I can still remember cutting them in half and watching the plum juice flow and mix with the cream: it was pure deliciousness! Nowadays when I fancy a similar taste (in a much lighter version of course) I simply cook some plums for a few minutes till they release their juices and have them with yogurt. Not the same but does the trick!

The below recipe combines cooked (or in this case – baked) plums that I like so much with a dessert I adore – a crumble. The crumble topping is made with porridge oats so I guess you could have it either as a dessert, or maybe even as breakfast on a lazy day, if served with yogurt.

INGREDIENTS (for 6-8 portions):

700g plums, washed, stoned and each cut into 8 pieces,
1 tbsp demerara sugar,
0.5 tsp cinnamon,

Crumble:
120g plain flour,
50g porridge oats,
50g dark muscovado sugar,
100g butter, cut into small cubes,
1 tbsp demerara sugar.

METHOD:
  1. Preheat an oven to 200 Celsius degrees.
  2. Put the prepared plums to an oven-proof dish, sprinkle the sugar and cinnamon on top, stir.
  3. In a bowl mix the flour, porridge oats and muscovado sugar, add the butter cubes and rub it in using your fingers until you can’t see any of the dry ingredients not combined with the butter but you have crumbs of different sizes.
  4. Scatter the crumble on top of the plums, sprinkle the Demerara sugar on top and put to the hot oven.
  5. Bake for 35-40 minutes.
crumble, plum, plums, plum crumble, oats, dessert, breakfast, recipe, recipes, healthy


Tuesday, 20 October 2015

Concentrated Vegetable Stock Paste [vegetarian]


stock, vegetable stock, stock cubes, concentrated stock, health, recipe, recipes


I like soups very much. They are - in general - healthy, low calorie and comforting. And everybody will find at least a few favorite ones as there are so many types of soups. However, despite this huge variety, all of them have at least one common denominator – stock.

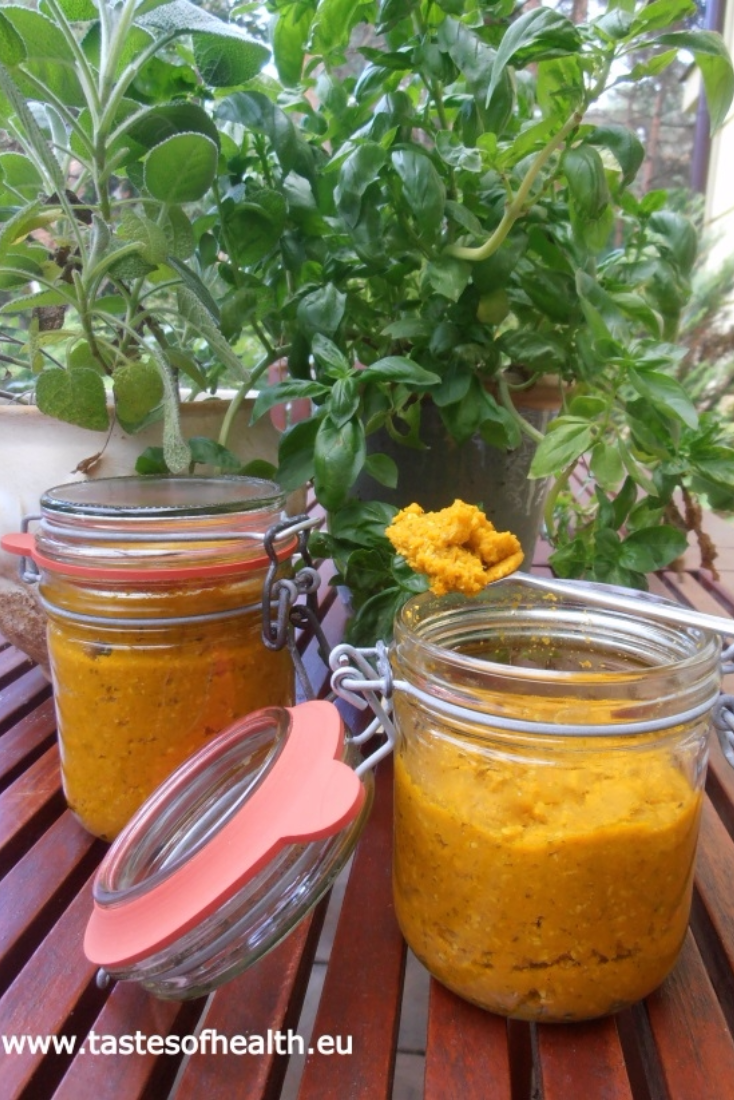
When you have time, you can prepare good quality stock earlier and then use it for your soups. But what if you don’t have time? You can use stock cubes although this is certainly not the healthiest option. There are plenty of hydrogenated fats in them, which are very bad for us. But luckily, if you get the ingredients (see below) and you have about an hour free, you can make your own ‘stock cubes’ or rather concentrated stock paste that kept in a tight jar in a fridge, will last you a few months.

I have to confess that in the past when I was in a rush, I would use stock cubes myself. I liked them for their immediacy and their taste. So when I started making and using this concentrated stock paste, the taste was my major issue: it was not bad, it was… unfamiliar! There are various flavor enhancers included in industrial made stock cubes and obviously I neither could nor would like to use them. Therefore I decided to substitute them with a more natural one – soya sauce – that ads this desirable ‘pleasant savory taste’ – umami. So I think the below combination and proportions of ingredients work really well and you will end up having a high quality, healthy and instant homemade concentrated stock paste.

INGREDIENTS (for approx. two 330ml jars):

250g carrots, peeled,
40g parsnip, peeled,
40g celeriac, peeled,
80g leak,
40g cabbage,
80g onion, peeled,
1 garlic clove, peeled
140g tomato,
1 bay leaf,
4 parsnip sprigs,
2 handfuls of fresh herbs (leaves only from basil, sage, etc.),
200g coarse sea salt,
35g white wine,
3 tbsp olive oil,
2 tbsp light soya sauce,
50g grated Parmesan cheese.

METHOD:
  1. Cut all the vegetables into pieces and put them to a kitchen processor; add the herbs and process till everything is almost liquidized.
  2. Transfer to a heavy bottomed pot, add the salt, wine, olive oil and soya sauce, stir and bring to boil on a medium heat.
  3. Decrease the temperature to low, cover the pot with a lid and cook for 20 minutes stirring occasionally.
  4. Take off the lid and cook for 10 minutes more, remembering to stir every now and then.
  5. Increase the temperature to high and cook stirring often for 10 minutes (towards the end of the cooking time you may have to stir the mixture all the time to prevent it from burning). You want all the liquid to evaporate and end up with a dry pulp.
  6. Add the grated Parmesan cheese, stir and transfer everything to the processor; liquidize till everything is very well combined.
  7. Put the prepared pulp to a sterilized jars and keep in a fridge for up to 3-4 months.
  8. To make stock use 2 tsp for 0.5l of water.
stock, vegetable stock, stock cubes, concentrated stock, health, recipe, recipes


Friday, 9 October 2015

4 Ingredients Peanut Butter and Amaranth Bars [gluten free]


amaranth, peanut butter, chocolate, healthy diet, recipe, recipes, health, gluten free


When I was wondering who would like these bars the most, I couldn’t make up my mind. For obvious reasons this is a great option for peanut butter and chocolate lovers as well as everybody who has a sweet tooth. But including amaranth in this recipe and using high quality ingredients makes it a healthy treat so whoever is into healthy diet, will also be extremely happy with them. And also, you need only 4 ingredients and max. 15 minutes to make these bars so either people who don’t like complicated recipes or those who don’t like to (or can’t) spend too much time in the kitchen should be ecstatic as well.

So I still don’t know which group would like them the most. But what I do know is that my family loved them: they disappeared in no time!

INGREDIENTS (for 16 bars):

160g peanut butter,
100g honey,
30g amaranth popping,
100g dark chocolate (60% cocoa).

METHOD:
  1. Cover a bottom and sides of a small baking tray (I used 14 cm x 23cm) with baking parchment.
  2. Put the peanut butter and honey to a pan and warm up on a medium heat until runny (but don’t boil them).
  3. Add the amaranth popping and stir well.
  4. Transfer it into the prepared tin and smooth with the back of a spatula.
  5. Melt the chocolate in the microwave or over a pan of simmering water and pour over the amaranth mixture.
  6. Spread it and leave in the fridge for at least 30 minutes.
amaranth, peanut butter, chocolate, healthy diet, recipe, recipes, health, gluten free

These bars have been inspired by a recipe from www.simplyquinoa.com

Wednesday, 7 October 2015

Delicious Fruity Porridge


porridge, oats, health benefits, whole grains, healthy breakfast, health, healthy, recipes

Porridge is very healthy – how many times did we hear that when we were children, or how many times have we told this to our children ourselves? But do we really know why it is so healthy? Since I wasn’t sure myself, I decided to do a little research on oats myself.

Right at the beginning I have found out that by eating a bowl of porridge every day, people with high cholesterol can decrease its level by 8-23%, and as a result also reduce the risk of cardiovascular disease and stroke. Additionally, oats contain fiber called beta-glucan that boosts the immune system’s response to bacterial infection which means that immune cells react faster and are more able to fight out many bacteria.

Eating oats (and other whole grains) from one hand lowers the risk of getting type 2 diabetes disease but from the other – it helps to keep changes of the blood sugar level under control for people who already suffer from this illness. It also decreases the risk of childhood asthma.

And finally (although I am sure not lastly) whole grain fiber helps in protecting woman against breast cancer: premenopausal woman whose daily intake of this type of fiber amounts to at least 13g, lower the risk of breast cancer by 41%.

Now, with all this newly garnered information I know that when I have my own porridge in the morning, I not only have a delicious breakfast but I also invest in my health at so many different levels :).

INGREDIENTS (for 1 portion):

4 tbsp rolled oat flakes (porridge oats),
0.25 cup water,
0.25 cup milk,
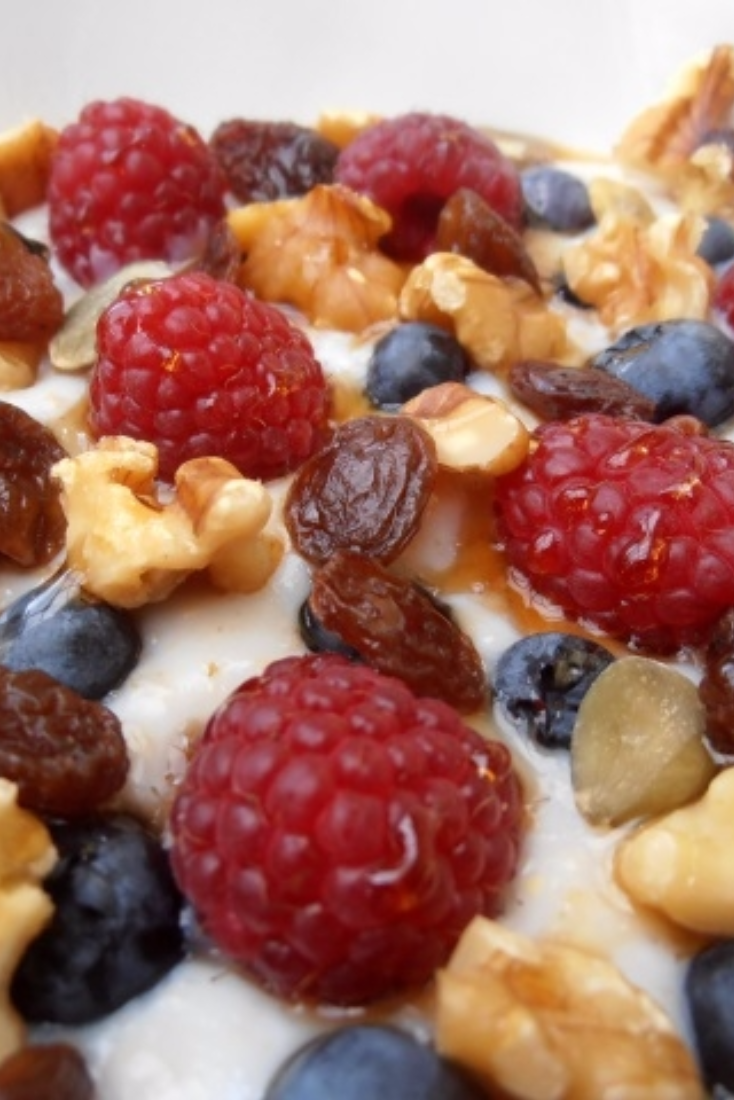
To serve: raspberries, blueberries, pumpkin seeds, walnut pieces, raisins, honey.

METHOD:
  1. Pour the water and flakes into a small pan, stir and bring to boil; add the milk and after everything boils again cook stirring for 5-8 minutes.
  2. Pour the porridge to a bowl and sprinkle with the berries, seeds, nuts and honey.
porridge, oats, health benefits, whole grains, healthy breakfast, health, healthy, recipes


Friday, 2 October 2015

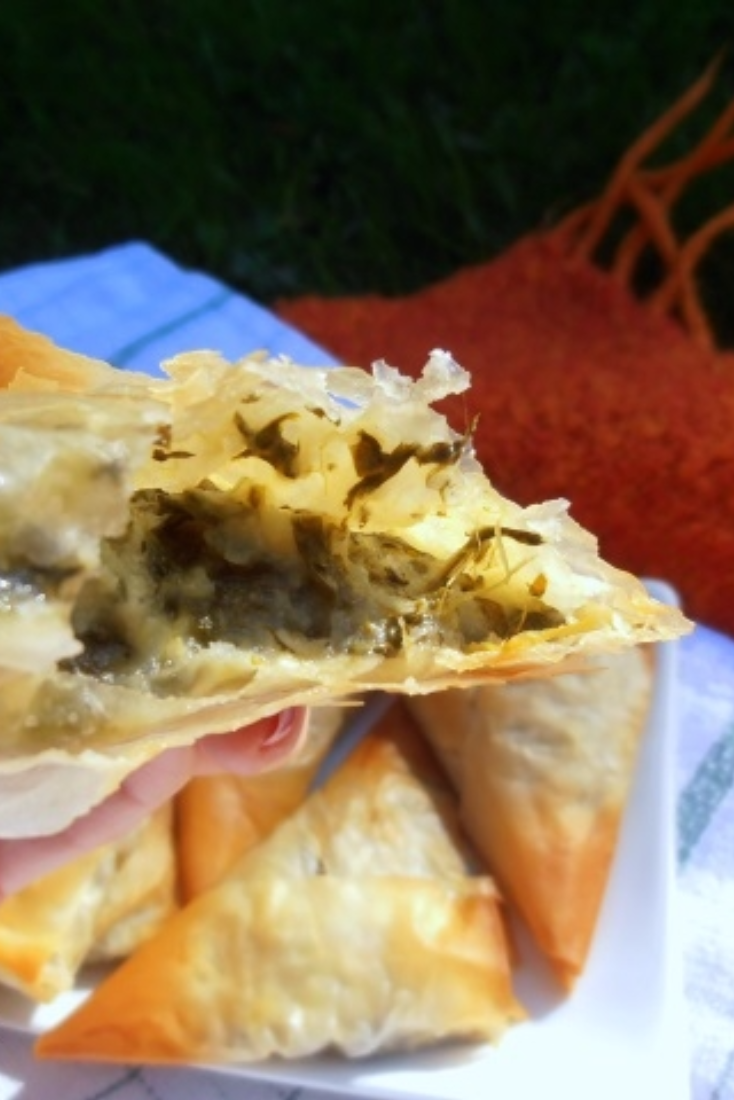
Filo Pastries with Potato, Spinach and Feta Filling [vegetarian]


spinach, potato, feta, pastry, pastries, healthy snack, picnic, recipe, recipes, health, vegetarian


Autumn has finally arrived again. The days are shorter, the nights are colder and leaves on trees slowly start turning golden and brown. Luckily the weather is still pretty good so how about taking an advantage of it and enjoying maybe the last picnic of the year?

My suggestion for an autumn picnic dish is a loose variation on Greek Spanakopita recipe: I have made individual pastries (as they are easier to eat when you don’t necessarily have plates with you) and their filling includes potatoes (thanks to them the filling stays together). But what if the weather doesn’t permit to enjoy these pastries on an outing? Then they are still a great idea for a buffet or a healthy snack that can be taken to school or work.

INGREDIENTS (for approx. 20 pastries):

500g potatoes, peeled and cut into cubes,
2 tbsp olive oil,
2 garlic cloves, thinly chopped,
300g washed spinach (if you are using frozen spinach then thaw it at first and squeeze out the excess of water),
3 tbsp milk,
200g feta cheese, crumbled into very small pieces,
5 filo pastry sheets,
salt and pepper,
olive oil for greasing the sheets.

METHOD:
  1. Boil the potatoes in salty water till soft.
  2. In a big frying pan warm the olive oil; add the spinach and fry until water evaporates, add the garlic and fry for 2-3 minutes more.
  3. Drain the potatoes, mash them with milk using the potato masher until smooth and add the feta cheese, mix well.
  4. Cut the fried spinach and add it to the potato and feta mixture, stir well and season.
  5. Preheat an oven to 220 Celsius degrees (200 fan oven).
  6. Take one sheet of filo pastry, brush it with olive oil (if you want to use less olive oil, use your hands instead of a brush) and cut along the longer side. The sheets I used were 35cm x 45cm so from one sheet I had 4 strips approx. 8.5x45cm.
  7. In a corner of one strip of filo pastry put 1 tbsp of the filling and flip it over so you have a triangle of the pastry on top. Press the filling to spread it and carry on turning the triangle till you have used the whole strip (see the photos below). Place it on a baking tray covered with baking paper and brush with a bit of olive oil.
  8. Repeat with the rest of pastries. The pastries can be prepared a day in advance and kept in a fridge on a baking tray covered with cling film.
  9. Put the baking try with the pastries to the hot oven, bake for 8-10 minutes. 


spinach, potato, feta, pastry, pastries, healthy snack, picnic, recipe, recipes, health, vegetarian


Wednesday, 30 September 2015

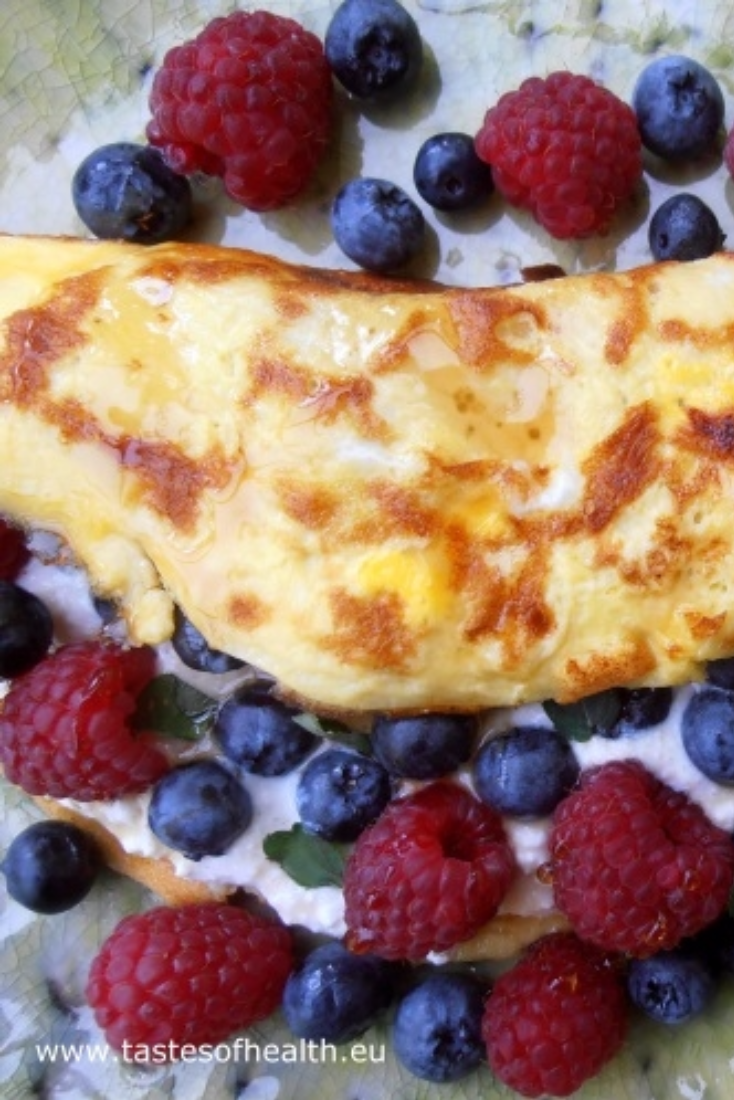
Egg Pancake with Cottage Cheese and Fruit [gluten free]


egg, breakfast, healthy breakfast, pancake, gluten free


Breakfast is the most important meal of a day. Unfortunately many of us either forget about it, or simply think they don’t have enough time in the morning to prepare something healthy, tasty and nutritious. But in truth this is only an excuse because proper breakfast can be prepared in minutes. And the below recipe is just one example of such a breakfast recipe.

The base of the recipe is something between a pancake and an omelette, I call it Egg Pancake as it is made only with an egg and a drop of milk, but it is very thin just like pancakes are. It is topped with cottage cheese (for extra proteins) and berries (for vitamins). Because there is no flour added to this pancake, people with gluten intolerance can eat it, too. Making this dish takes a few minutes only but you end up with a delicious and super healthy breakfast that will give you lots of energy to start your day very well.

INGREDIENTS (for 1 portion):

1 egg,
1 tbsp milk,
a drop of olive oil,
3 tbsp cottage cheese,
0.5 tsp honey,
pinch of cinnamon,
raspberries, blueberries, mint leaves,
extra honey for serving.

METHOD:
  1. In a cup beat quickly with a fork the egg and milk.
  2. Mix the cottage cheese with the honey and cinnamon.
  3. Put a drop of olive oil on an 18cm-diameter non-stick frying pan (you can use a smaller one but it shouldn’t be bigger as the pancake will be very thin and difficult to handle) and smear it all over the frying pan with a paper towel.
  4. Heat the frying pan and pour the beaten egg.
  5. Fry the pancake till it sets, gently flip it over the other side with a spatula. To prevent the pancake from breaking, pry the edge of the pancake with the spatula at first.
  6. Place the pancake on a plate, cover half of it with the cottage cheese, put the fruit and mint leaves on top and cover with the other half of the pancake.
  7. Serve with extra honey on top.
egg, breakfast, healthy breakfast, pancake, gluten free


Friday, 25 September 2015

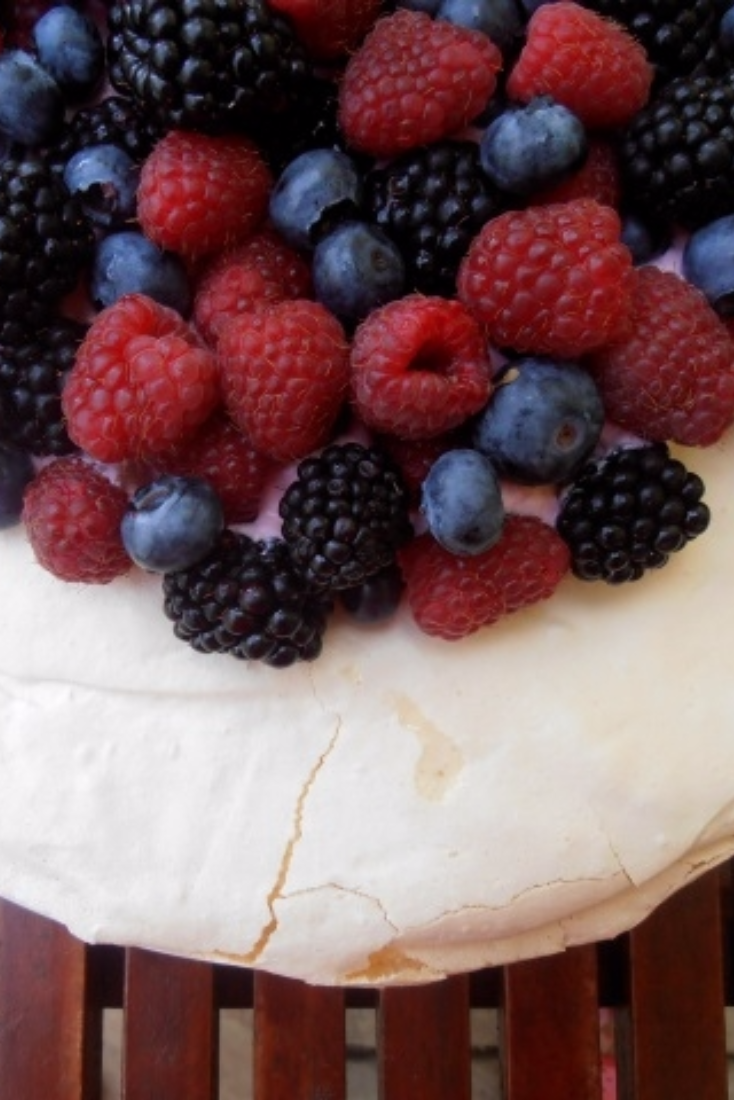
Meringue Torte with Raspberry Cream


meringue, meringue cake, torte, raspberry, mascarpone


If you read my previous post on meringues, you know I am somewhat obsessed with them. So when some time ago my neighbor suggested going to a café serving some great meringue cakes, she didn’t have to repeat her invitation twice. And she was right: the raspberry version was absolutely delicious!

It was so delicious that I quickly wanted to recreate it in my own kitchen at home. I based it on my Meringue Cake with Strawberry Cream recipe but since I wanted to intensify the raspberry flavor, I added more fruit, both liquidized and torn into small pieces, and more mascarpone to prevent the cream from becoming too runny. I also found a way to stop the cream from spreading beyond the meringue: instead of putting the cream on the whole meringue base, I left approximately a 3-4cm free margin from the edge. This way even though the cream spread a bit, it didn’t ooze out beyond the meringue itself.

INGREDIENTS (for 8-10 portions):

Meringue:
6 egg whites,
300g caster sugar,
1 tsp white wine vinegar,
a pinch of salt.

Cream:
300g raspberries,
6 tbsp icing sugar,
250g mascarpone cheese,
150ml double cream.

Extra fruit for decoration.

METHOD:
  1. Take two pieces of baking paper and draw 23cm - diameter circle on each one; then put them on two baking trays.
  2. Pre-heat an oven to 180 Celsius degrees.
  3. Put the egg whites to a big, clean and dry bowl, add a pinch of salt and beat them with an electric mixer.
  4. When they are stiff, start adding sugar (while you still beat the egg whites): add one tablespoon at a time and carry on beating for 20-30 seconds before you add another tablespoon of sugar.
  5. When you have used all the sugar, keep on whisking for another 2-3 minutes, then add the vinegar and beat for another minute.
  6. Divide the beaten egg whites into 2 portions and carefully spread them on the drawn circles, put both baking trays to the hot oven.
  7. After 5 minutes decrease the temperature to 140 Celsius degrees and bake for 90 minutes; afterwards turn off the oven, open its doors slightly and keep it open for 5 minutes. Then close the door and keep the meringues in the oven for a few hours or overnight.
  8. Liquidize approx. two thirds of the raspberries, press them through a fine sieve, add the sugar and stir till the sugar dissolves.
  9. Put the mascarpone to a bowl, beat with the electric mixer on low speed and add the liquidized raspberries.
  10. Whisk the double cream till stiff and gently stir with the mascarpone and raspberry mix till combined.
  11. Tear the rest of the raspberries into smaller pieces, add to the cream and gently stir.
  12. Put one meringue disc (the worse looking one) on a serving plate, spread three quarters of the raspberry cream on it, leaving a 3-4cm margin around the edges without the cream. Place the second meringue carefully on top, spread the rest of the cream on top and decorate with fruit.
  13. Keep refrigerated till ready to be served.
meringue, meringue cake, torte, raspberry, mascarpone


Saturday, 19 September 2015

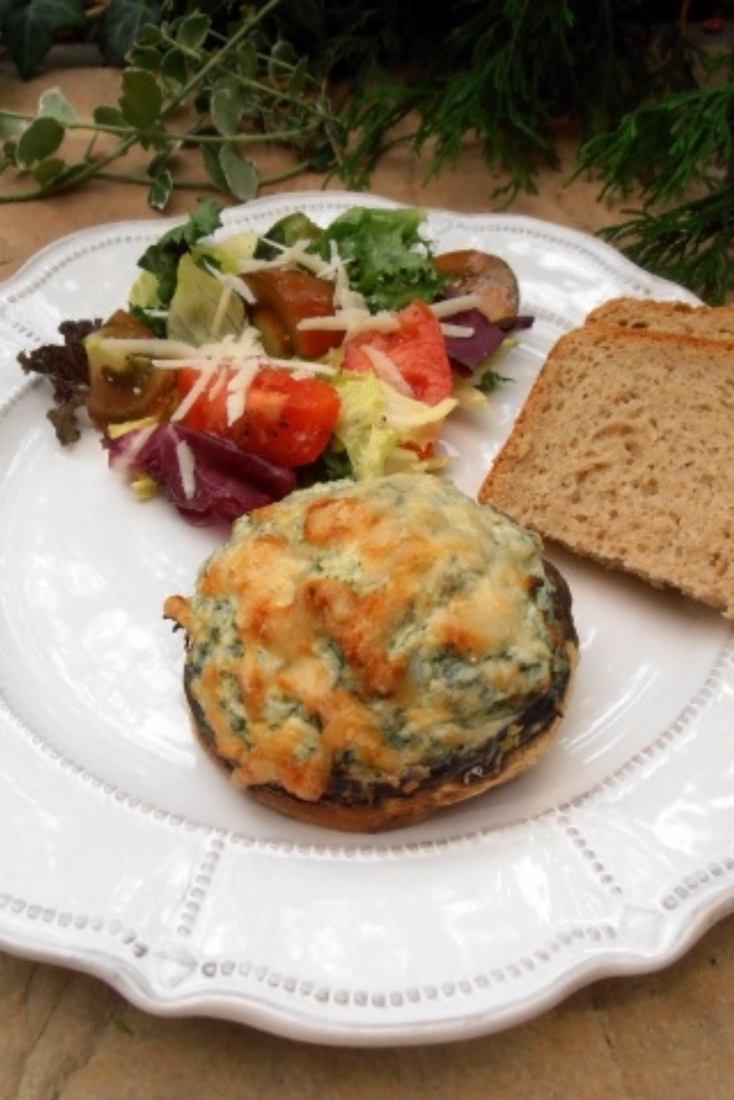
Mushrooms Stuffed with Ricotta and Spinach [vegetarian]


mushrooms, spinach, ricotta, stuffed mushrooms, vegetarian,

When I was making Mushrooms Stuffed with Ricotta and Pesto some time ago, I thought I could try to make them with another stuffing. This time I wanted to make a lunch dish and used big Portobello mushrooms, one per person. When it came to choosing a filling, I decided to check how ingredients that I normally use for spinach gnocchi would work, I only omitted flour and egg that help the gnocchi keep their shape.

Everything worked very well together and we ended up with a delicious, light but satisfying summer lunch that I know could also be used a starter for a lunch or dinner party.

INGREDIENTS (for 4 portions):

250g fresh spinach, washed and dried,
2 garlic cloves, crushed or thinly cut,
250g ricotta cheese,
50g grated Parmesan cheese,
a big handful of basil leaves,
4 big mushrooms (e.g. Portobello), each weighing approx. 100g, washed and pat dried,
salt and pepper,
a drop of oil for greasing.

METHOD:
  1. Put the spinach in a big non-stick frying pan and fry it, stirring it until it is wilted and the water evaporates; half way through the cooking, add the garlic.
  2. When the spinach is cool enough to handle, squeeze the water out.
  3. Cut the spinach and the basil thinly.
  4. Preheat a fan oven to 180 Celsius degrees.
  5. Grease an ovenproof dish.
  6. Put the ricotta cheese to a bowl, add half of the Parmesan, spinach and basil, stir, check the taste and season with salt and pepper.
  7. Stuff each mushroom with a quarter of the ricotta and spinach filling, put to the prepared dish and sprinkle with the rest of Parmesan.
  8. Bake in the hot oven for 30 minutes.
  9. Serve with a salad.
mushrooms, spinach, ricotta, stuffed mushrooms, vegetarian,