Wednesday 30 September 2015

Egg Pancake with Cottage Cheese and Fruit [gluten free]


egg, breakfast, healthy breakfast, pancake, gluten free


Breakfast is the most important meal of a day. Unfortunately many of us either forget about it, or simply think they don’t have enough time in the morning to prepare something healthy, tasty and nutritious. But in truth this is only an excuse because proper breakfast can be prepared in minutes. And the below recipe is just one example of such a breakfast recipe.

The base of the recipe is something between a pancake and an omelette, I call it Egg Pancake as it is made only with an egg and a drop of milk, but it is very thin just like pancakes are. It is topped with cottage cheese (for extra proteins) and berries (for vitamins). Because there is no flour added to this pancake, people with gluten intolerance can eat it, too. Making this dish takes a few minutes only but you end up with a delicious and super healthy breakfast that will give you lots of energy to start your day very well.

INGREDIENTS (for 1 portion):

1 egg,
1 tbsp milk,
a drop of olive oil,
3 tbsp cottage cheese,
0.5 tsp honey,
pinch of cinnamon,
raspberries, blueberries, mint leaves,
extra honey for serving.

METHOD:
  1. In a cup beat quickly with a fork the egg and milk.
  2. Mix the cottage cheese with the honey and cinnamon.
  3. Put a drop of olive oil on an 18cm-diameter non-stick frying pan (you can use a smaller one but it shouldn’t be bigger as the pancake will be very thin and difficult to handle) and smear it all over the frying pan with a paper towel.
  4. Heat the frying pan and pour the beaten egg.
  5. Fry the pancake till it sets, gently flip it over the other side with a spatula. To prevent the pancake from breaking, pry the edge of the pancake with the spatula at first.
  6. Place the pancake on a plate, cover half of it with the cottage cheese, put the fruit and mint leaves on top and cover with the other half of the pancake.
  7. Serve with extra honey on top.
egg, breakfast, healthy breakfast, pancake, gluten free


Friday 25 September 2015

Meringue Torte with Raspberry Cream


meringue, meringue cake, torte, raspberry, mascarpone


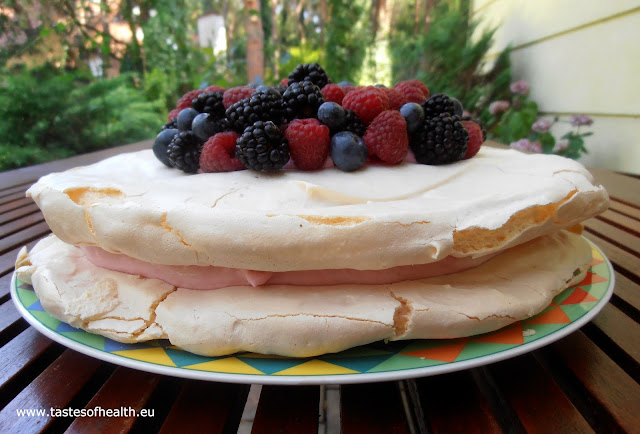
If you read my previous post on meringues, you know I am somewhat obsessed with them. So when some time ago my neighbor suggested going to a café serving some great meringue cakes, she didn’t have to repeat her invitation twice. And she was right: the raspberry version was absolutely delicious!

It was so delicious that I quickly wanted to recreate it in my own kitchen at home. I based it on my Meringue Cake with Strawberry Cream recipe but since I wanted to intensify the raspberry flavor, I added more fruit, both liquidized and torn into small pieces, and more mascarpone to prevent the cream from becoming too runny. I also found a way to stop the cream from spreading beyond the meringue: instead of putting the cream on the whole meringue base, I left approximately a 3-4cm free margin from the edge. This way even though the cream spread a bit, it didn’t ooze out beyond the meringue itself.

INGREDIENTS (for 8-10 portions):

Meringue:
6 egg whites,
300g caster sugar,
1 tsp white wine vinegar,
a pinch of salt.

Cream:
300g raspberries,
6 tbsp icing sugar,
250g mascarpone cheese,
150ml double cream.

Extra fruit for decoration.

METHOD:
  1. Take two pieces of baking paper and draw 23cm - diameter circle on each one; then put them on two baking trays.
  2. Pre-heat an oven to 180 Celsius degrees.
  3. Put the egg whites to a big, clean and dry bowl, add a pinch of salt and beat them with an electric mixer.
  4. When they are stiff, start adding sugar (while you still beat the egg whites): add one tablespoon at a time and carry on beating for 20-30 seconds before you add another tablespoon of sugar.
  5. When you have used all the sugar, keep on whisking for another 2-3 minutes, then add the vinegar and beat for another minute.
  6. Divide the beaten egg whites into 2 portions and carefully spread them on the drawn circles, put both baking trays to the hot oven.
  7. After 5 minutes decrease the temperature to 140 Celsius degrees and bake for 90 minutes; afterwards turn off the oven, open its doors slightly and keep it open for 5 minutes. Then close the door and keep the meringues in the oven for a few hours or overnight.
  8. Liquidize approx. two thirds of the raspberries, press them through a fine sieve, add the sugar and stir till the sugar dissolves.
  9. Put the mascarpone to a bowl, beat with the electric mixer on low speed and add the liquidized raspberries.
  10. Whisk the double cream till stiff and gently stir with the mascarpone and raspberry mix till combined.
  11. Tear the rest of the raspberries into smaller pieces, add to the cream and gently stir.
  12. Put one meringue disc (the worse looking one) on a serving plate, spread three quarters of the raspberry cream on it, leaving a 3-4cm margin around the edges without the cream. Place the second meringue carefully on top, spread the rest of the cream on top and decorate with fruit.
  13. Keep refrigerated till ready to be served.
meringue, meringue cake, torte, raspberry, mascarpone


Saturday 19 September 2015

Mushrooms Stuffed with Ricotta and Spinach [vegetarian]


mushrooms, spinach, ricotta, stuffed mushrooms, vegetarian,

When I was making Mushrooms Stuffed with Ricotta and Pesto some time ago, I thought I could try to make them with another stuffing. This time I wanted to make a lunch dish and used big Portobello mushrooms, one per person. When it came to choosing a filling, I decided to check how ingredients that I normally use for spinach gnocchi would work, I only omitted flour and egg that help the gnocchi keep their shape.

Everything worked very well together and we ended up with a delicious, light but satisfying summer lunch that I know could also be used a starter for a lunch or dinner party.

INGREDIENTS (for 4 portions):

250g fresh spinach, washed and dried,
2 garlic cloves, crushed or thinly cut,
250g ricotta cheese,
50g grated Parmesan cheese,
a big handful of basil leaves,
4 big mushrooms (e.g. Portobello), each weighing approx. 100g, washed and pat dried,
salt and pepper,
a drop of oil for greasing.

METHOD:
  1. Put the spinach in a big non-stick frying pan and fry it, stirring it until it is wilted and the water evaporates; half way through the cooking, add the garlic.
  2. When the spinach is cool enough to handle, squeeze the water out.
  3. Cut the spinach and the basil thinly.
  4. Preheat a fan oven to 180 Celsius degrees.
  5. Grease an ovenproof dish.
  6. Put the ricotta cheese to a bowl, add half of the Parmesan, spinach and basil, stir, check the taste and season with salt and pepper.
  7. Stuff each mushroom with a quarter of the ricotta and spinach filling, put to the prepared dish and sprinkle with the rest of Parmesan.
  8. Bake in the hot oven for 30 minutes.
  9. Serve with a salad.
mushrooms, spinach, ricotta, stuffed mushrooms, vegetarian,


Wednesday 16 September 2015

Quinoa Salad with Raisins and Chickpeas [vegetarian]


quinoa, healthy lunch, salad, feta, chickpeas, vegetarian

When I came across the original recipe for this salad, I straight away knew I was going to exchange the couscous for quinoa. And it is not that I am not keen on couscous – I like it a lot – but using the quinoa turned this salad into a very healthy lunch dish containing complete vegetarian proteins.

But this salad is not only healthy, it is also delicious. It has sweetness of raisins, nutty taste of chickpeas and saltiness of feta cheese. It also contains coriander in two forms: whole seeds that give a crunch and leaves that give wonderful fragrance. This salad can be prepared in the evening and enjoyed for lunch at work or school next day.

INGREDIENTS (2-4 portions):

0.5 cup quinoa,
a drop of olive oil,
1 cup of water,
1 tin chickpeas (or 200g cooked chickpeas),
100g raisins,
2 tsp coriander seeds,
zest of 1 lemon,
2 handfuls of chopped coriander leaves,
200g feta cheese,

Dressing:
3 tbsp olive oil,
2 tbsp lemon juice,
0.5 tsp ground cumin,
Salt and pepper.

METHOD:
  1. Prepare the quinoa: put it to a fine mesh strainer, rinse it well (for at least 1 minute) under running water and drain well. Heat a drizzle of olive oil in a pot over a medium heat and fry the drained quinoa for about 1 minute till the rest of the water evaporates. Add water, 0.25 tsp salt and bring to boil. Lower the heat and cook for approx. 15 minutes. Take it out from the heat and let it rest covered for 5 minutes more. Fluff the quinoa with a fork.
  2. Put to a bowl cooked quinoa, chickpeas, raisins, coriander seeds and leaves, zest of lemon and stir.
  3. Mix the dressing ingredients and pour over the salad, stir well, check the seasoning and if necessary adjust.
  4. Serve with crumbled feta cheese on top.
This recipe is based on a recipe from a book "Fresh Flavors from Israel" by R. Oliver, O. Pely-Bronshtein, S. Lipa-Angel

quinoa, healthy lunch, salad, feta, chickpeas, vegetarian


Saturday 12 September 2015

Cheesecake Tart with Blueberries


tart, cheesecake, blueberries


Necessity is the mother of invention – this saying yet again proved itself, when it came to this recipe. One day I had some quark (cottage cheese) and some blueberries left and I was thinking how I could use them. The easiest solution – cheesecake - wouldn’t have worked as I didn’t have enough of the cheese so a tart seemed to be a better answer. Sadly, the outcome wasn’t as good as I expected because I found the filling of the tart too grainy.

But a few days later I wanted to give this cake concept another chance and used cream cheese instead of the quark. This time the result was heavenly: a scrumptious tart with melt-in-your-mouth filling that tasted a bit like New York cheesecake but with a bonus – juicy blueberries bursting in your mouth with every bite of this cake.

INGREDIENTS:

Base:
190g plain flour,
130g butter of room temperature (plus a bit extra for greasing),
35ml milk of room temperature,
1 tbsp caster sugar,
1 egg yolk,
pinch of salt,

Filling:
600g cream cheese, *
150ml of double cream,*
3 eggs,*
120g caster sugar,
1 tsp vanilla extract,
100g blueberries.

METHOD:
  1. Using a food processor or manually combine quickly all the cake ingredients, form a flattened ball, cover it in cling film and put to a fridge for at least 2 hours.
  2. Butter well a bottom and a side of a 26cm-diameter loose-bottom tart tin.
  3. Preheat an oven to 220 Celsius degrees (200 for fan ovens).
  4. Roll the pastry thinly (best done between 2 sheets of baking paper) and transfer it into the tin.
  5. Pierce the pastry with a fork a few times and line it with baking paper, put baking beans on top.
  6. Transfer the tin to the hot oven and immediately decrease the temperature to 190 Celsius degrees (170 for fan ovens); bake for 15 minutes. Remove the paper and beans and bake for 5 minutes more.
  7. Mix together the cream cheese, cream, eggs, sugar and vanilla extract until combined and smooth.
  8. Pour it over the baked base and sprinkle the blueberries on top.
  9. Decrease the oven temperature to 150 Celsius degrees (no fan), put the tart to the oven and bake for 40 min.
  10. After that time turn off the oven but keep the cake in for 2 hours; afterwards transfer to a fridge.
  11. Take it out from the fridge 30 minutes before serving.

* Cream cheese, cream and eggs should be at room temperature.

tart, cheesecake, blueberries


Wednesday 9 September 2015

Raspberry Jam [confiture]


raspberries, jam, raspberry jam, sterilizing jars


If you have never made any preserves yourself, this Raspberry Jam is probably ideal to start with. Although the preparation is almost exactly the same as for the Strawberry Jam – which means it will take 2-3 days – somehow I find the raspberry confiture easier to make. Probably it is due to the fact that raspberries have more pectin than strawberries and on the final day of cooking the jam is almost always done after 30 minutes so no need for checking the consistency over and over again.

I love Raspberry Jam for its taste and aroma but it also has some health benefits. Raspberries help in decreasing fever so having a cup of tea with a spoon (or two!) of homemade jam in winter may not only bring memories of summer days but it can also speed up a recovery from a cold.

INGREDIENTS (for approx. 3 jars):

1kg raspberries,
800g sugar,
1.5 lemon (juice and peel).

METHOD:
  1. Rinse the raspberries under running cold water, drain well and transfer to a non-metallic bowl and cover with sugar; leave for several hours/overnight.
  2. The next day transfer the raspberries with sugar to a pan, add the lemon juice and rind, gently bring to boil; lower the heat and cook for 30 minutes. If there was not a lot of juice when you transferred the raspberries to the pan, you have to bring the jam to boil very gently so the sugar doesn’t burn. You will also have to be very careful when you stir it because the raspberries break easily so you can try to shake the pot instead, or if you have to stir, do it carefully with a spatula.
  3. Leave the jam in a cold place for approx. 24 hours.
  4. The next day bring the jam to a boil and simmer it on a medium heat for approximately 30 minutes until the Confiture reaches the right consistency.*
  5. Remove the lemon peel and pour the Confiture to prepared jars**, cover with lids, seal and put all the jars upside down on a towel, then cover them with the towel tightly. If you spill any of the Confiture on top of the jar, clean it well.
  6. Keep the jars covered for a few hours, afterwards you can keep them in a cool place for up to a year.
* This is the way to check, if the Confiture has reached the right consistency:
  • Put 1-2 saucers to a freezer for at least 30 minutes.
  • After you simmered the jam for 30 minutes (step 4), take one saucer from the freezer, spoon a bit of jam on it and leave it for 1-2 minutes. If there is a skin on top that wrinkles when you touch it, the Confiture is ready. If not, you have to cook it a few minutes longer and re-test.
** There are many ways of sterilizing jars but this is the one I have already used for a few years:
  • wash jars and lids very well,
  • put them to a big bowl,
  • a minute or so before you are ready to put your jam to jars, pour boiling water to the bowl with jars,
  • after at least 30 seconds gently take one jar from the bowl and pour in the Confiture.
  • The jars will be very hot so you have to use an oven glove to hold them.
raspberries, jam, raspberry jam, sterilizing jars


Friday 4 September 2015

Ricotta and Pesto Stuffed Mushrooms [vegetarian]


mushrooms, stuffed mushrooms, ricotta, pesto, vegetarian


I have always been a big fan of mushrooms, both wild and cultivated. But for a long time I was the only one who did in my family. For years my daughters were scared they were going to get poisoned by them (even by the champignons!) and my husband could simply live without them.

But even back then I made these stuffed mushroom, especially if we had guests who would appreciate them more. They are a really delicious starter for a Mediterranean theme dinner or a pot-luck gathering, as they can be baked earlier and eaten later at room temperature.

INGREDIENTS (for 4 portions):

16-20 medium-sized mushrooms,
250g ricotta cheese,
2 tbsp green pesto (plus extra for decorating),
2 garlic cloves, thinly sliced,
30g grated Parmesan cheese,
salt and pepper,
1 tbsp olive oil.

METHOD:
  1. Wash and dry the mushrooms; trim their stalks.
  2. Preheat an oven to 200 Celsius degrees (180C degrees for fan ovens).
  3. Mix together the ricotta, pesto, garlic, half of Parmesan cheese and the seasoning.
  4. Grease with the olive oil an ovenproof dish big enough for all the mushrooms to be put in one layer (or use 2 smaller ones).
  5. Fill in all the mushrooms with the ricotta mix, place them in the dish and sprinkle with the Parmesan cheese.
  6. Bake in the hot oven for 20 minutes or until golden.
  7. Put a bit of pesto on top of each baked mushroom.
mushrooms, stuffed mushrooms, ricotta, pesto, vegetarian


Wednesday 2 September 2015

Sweet Yeast Rolls with Cheese Filling [My Grandma’s Baking - Part II]


how to make yeast rolls, rolls, yeast rolls, cottage cheese, recipe, recipes


It was my grandmother that taught me how to properly and successfully make yeast dough for the first time, but only recently I found out how she had learnt that skill. When she was a young but already a married woman, she realized she didn’t know how to bake.  However she had a neighbor who was very good at it, so one day when my grandma met her, she casually led their conversation into the cake subject. The lady explained all the steps in details but my grandma, who was too embarrassed to admit she had never baked a yeast cake before, responded “oh, this is exactly how I make my cakes” and quickly went back home to put this newly gained knowledge into practice!

So thanks to this little trick of my grandma, also I know now how to make yeast rolls to end up with a wonderful soft and airy result.

INGREDIENTS (makes 12):

250ml milk,
60g sugar,
20g yeast,
75g butter,
2 egg yolks,
300g plain flour,
pinch of salt,

Filling:
300g cream cheese or ricotta cheese,
1 egg yolk,
4 tbsp sugar,
1 tsp vanilla extract.

Icing:
0.5 cup icing sugar,
2 tbsp water.

METHOD:
  1. Warm up the milk. It should be warm but not hot, hot milk will “kill” yeast.
  2. Pour half the milk to a cup, add 2 tbsp of sugar and the yeast, stir it and leave till it rises.
  3. Melt the butter.
  4. Beat the egg yolks with the rest of sugar till creamy.
  5. Put the flour and salt to a big bowl, add the milk and beaten egg yolks and knead for a minute until more or less combined; add the yeast mixture and knead for 1-2 minutes and finally add the melted butter. Knead the dough until it is smooth (however small lumps are fine) and it doesn’t stick to your hand anymore. It should take about 5-7 minutes.
  6. Leave the bowl with the dough in a warm place until it doubles in size. Depending on the temperature, it can take between 1 and 2 hours.
  7. Prepare the cheese filling by mixing with an electric mixer the cheese, egg yolk, sugar and vanilla extract.
  8. Cover a bottom of a big baking tray with baking paper.
  9. Transfer the dough onto a kitchen surface dusted lightly with flour; spread it into a shape of rectangle roughly 25x35cm. The best way to do it is with your hands but make sure you cover your hands with oil at first to prevent the dough from sticking to them.
  10. Spread the cheese feeling on top of the dough, roll it (along the shorter side) and cut it into approx. 12 slices. Arrange them on the baking tray and leave the buns to rise (approx. 10-15 min.)
  11. Preheat an oven to 180 Celsius degrees (fan oven).
  12. When the rolls have risen, place the tray in the hot oven and bake for 25-30 min.
  13. Mix the icing sugar with water and swirl the icing on top of the baked rolls. 
how to make yeast rolls, rolls, yeast rolls