Showing posts with label chocolate. Show all posts

Tuesday, 12 April 2016

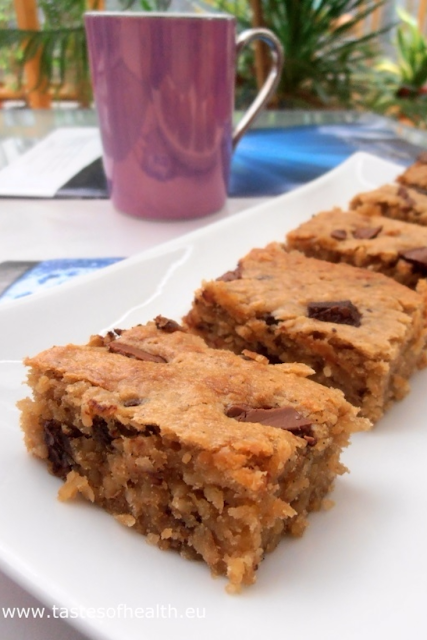
Banana Blondie with Chocolate [gluten free / vegan*]


blondie, blondies, banana blondie, banana blondies, vegan cake, chocolate, vegan blondie, banana, vegan, cake

My adventure with cooking really started with baking in my early teens. That is why it is difficult for me to imagine never eating cakes. However - since I know that cakes are better for your taste buds than your waistline - I try to test out healthier options where plain white flour is replaced by wholemeal or by almond flour. If possible, I also swap butter for healthy oil (e.g. rapeseed, though it doesn’t always work due to its strong smell), and I always try to use less sugar.

So I was extremely happy when I came across a recipe for blondies that neither requires butter nor flour. To make it vegan, I made some additional changes and at the end the cake turned out great: moist and fudgy. 

I know you may be skeptical about cakes without eggs, flour or butter. And I agree that they taste differently. But differently doesn't always mean bad. So even if you are one of the people thinking that vegan cakes are not really for you as they are “too healthy”, I think you will be nicely surprised.

* The cake is 100% vegan if you use vegan chocolate.

INGREDIENTS (for 16 small pieces):

2 bananas,
120g rolled oats,
1tsp baking powder,
40g demerara sugar,
60ml maple syrup,
150g smooth peanut butter,
1 tsp vanilla extract,
100g coconut cream (the thick part of the coconut milk that collects on top of a tin),
40g chopped chocolate (if the cake has to be 100% vegan, use vegan chocolate).

METHOD:
  1. Preheat the oven to 200C (180C for fan ovens) and line a 14x24cm (or similar small) baking tin with parchment paper.
  2. Put all the ingredients except for the chocolate to a food processor and process till smooth.
  3. Add the majority of the chocolate pieces to the batter and stir.
  4. Pour it into the prepared tin, smooth the top and sprinkle with the rest of chocolate.
  5. Put the tin to the hot oven for 20-25 minutes.
  6. Enjoy!
blondie, blondies, banana blondie, banana blondies, vegan cake, chocolate, vegan blondie, banana, vegan, cake


This cake was inspired by Cafe Delites recipe.


Saturday, 27 February 2016

Chocolate Chia Pudding with Raspberries [vegan]


dessert, healthy breakfast, healthy dessert, vegan, chocolate, chocolate chia pudding, dietary fiber, recipe, recipes, healthy

As I mentioned in one of my previous posts, chia is still a novelty ingredient for me and I am fascinated by it: it is almost difficult to believe that so much goodness can be hidden in such tiny seeds, and dietary fiber is one of them. Since 34% of Chia is dietary fiber, it makes it one of the best sources in the world.

All types of plant food include dietary fiber – components that our body cannot absorb or digest so they go through our digestive system almost intact. And what it means to us is that high fiber food, in general, has less calories for the same volume as other types of food, which helps maintain a healthy weight.
Based on dissolving (or not) in water, there are 2 types of fiber: soluble and insoluble. Chia seeds are a great source of soluble fiber which is very beneficial to us because:
  • it reduces the risk of heart diseases by helping to lower the blood cholesterol and
  • it reduces the risk of developing type 2 diabetes by slowing down the absorption of sugar.
Adults should daily consume 20-35g of dietary fiber. If we consider having recommended 2 tablespoons of chia seeds (25-30g) per day, that tiny amount will provide us with approx. 40% of recommended daily intake of fiber in one go!

Since chia is so beneficial to our health then why not start a day with a delicious and easy to prepare chia breakfast? Which in truth is so good, it could be also served as a dessert.

INGREDIENTS (for 1 breakfast or 2 dessert portions):

125ml almond milk,
2 tbsp chia seeds,
1 tsp cacao powder,
4 tsp maple syrup,
100g raspberries.

METHOD:
  1. Pour the chia seeds into a small bowl with the almond milk, stir well with a fork and put to a fridge for min. 1.5 hours or overnight. If possible, stir again after 15 min.
  2. Add the cocoa powder and 2 tsp of the maple syrup to the chia and stir well.
  3. Liquidise or mash the raspberries with the 2 tsp of maple syrup.
  4. Serve in a glass layered chocolate chia and raspberries.
dessert, healthy breakfast, healthy dessert, vegan, chocolate, chocolate chia pudding, dietary fiber, recipe, recipes, healthy


Subscribe to our Delicious and Healthy Recipes Newsletter

* indicates required


Wednesday, 24 February 2016

Healthy Avocado Brownies [gluten free]


avocado, avocado brownies, brownie, brownies, chocolate, gluten free, healthy, healthy brownies, recipe, recipes

Who doesn’t love brownies? For sure I don’t belong to this group of people because I love them like almost everything else that contains chocolate. I especially adore brownies that my daughters have baked for the last few years. Their brownies are moist, chocolaty and rich. They are unfortunately also full of calories and fat as there is butter and plenty of sugar in them… So whenever I have those brownies, my guilt grows proportionately to the number of pieces I eat.

That’s why when I came across a brownie recipe that uses avocado instead of butter, I quickly had to test it out. To be honest I wasn’t ecstatic about the final outcome: I used chocolate with a very high percentage of cocoa solids and the cake was on the edge of being bitter. As I really liked the concept of healthier brownies, I didn’t want to give up and adjusted the recipe to make it sweeter without adding any more sugar. So I used a different type of chocolate and added lots of nuts as well as cranberries. That strategy worked really well: the result of my second attempt was most delicious.

INGREDIENTS (for 16 pieces):

100g dark chocolate (no more than 65% cocoa),
2 medium, ripe avocados, peeled and roughly mashed,
150g sugar,
2 tsp vanilla extract,
2 eggs,
40g cocoa powder,
45g almond flour or ground almonds,
40g dried cranberries,
100g mixed nuts (cashews, pistachios, Brazil nuts), roughly chopped,

METHOD:
  1. Preheat an oven to 175 Celsius degrees (or 150 for fan ovens).
  2. Line a small (e.g. 14cm x 24cm) baking tray with a parchment paper.
  3. Melt the chocolate in a microwave or over a pan of simmering water.
  4. Put to a food processor the avocados, sugar and vanilla extract; process them till smooth.
  5. Stir in the melted chocolate then add the eggs and process again till everything is combined.
  6. Add the cocoa powder and almond flour, mix well until combined.
  7. Stir in the dried cranberries and nuts; transfer to the baking tray and smooth the top.
  8. Bake for 30-35 minutes.

brownie, brownies, healthy brownies, avocado brownies, recipe, recipes, healthy, gluten free, avocado, chocolate


Based on a Half Baked Harvest's recipe  

Subscribe to our Delicious and Healthy Recipes Newsletter

* indicates required


Saturday, 21 November 2015

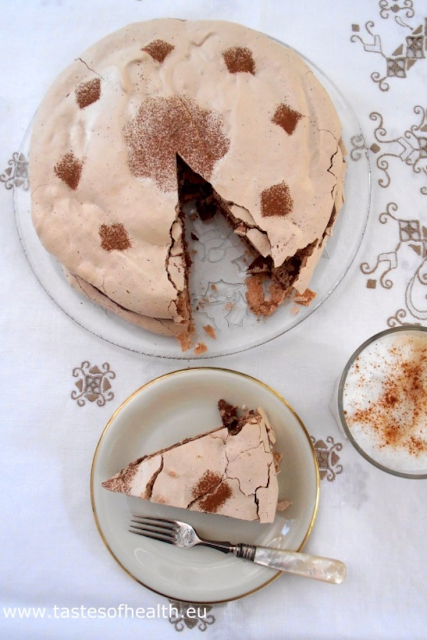
Meringue with Dark Chocolate Filling


meringue, chocolate, dried figs, dates, recipe, recipes, cake, dessert

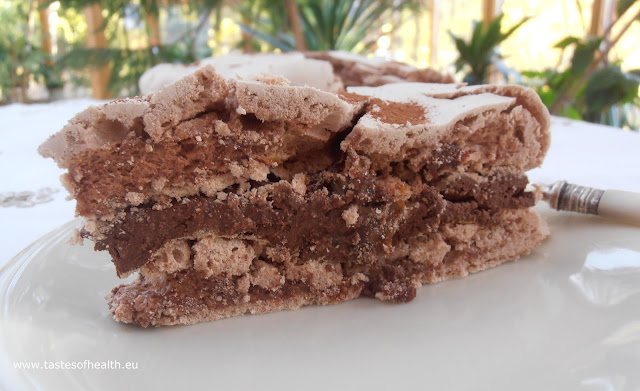
As it was the case with my previous meringue recipes (with strawberries and raspberries), this one has also been inspired by a cake I had in a confectionary. I ate it for the first time many years ago but somehow for a very long time I didn’t even try to make it myself and only enjoyed it when I went there occasionally.

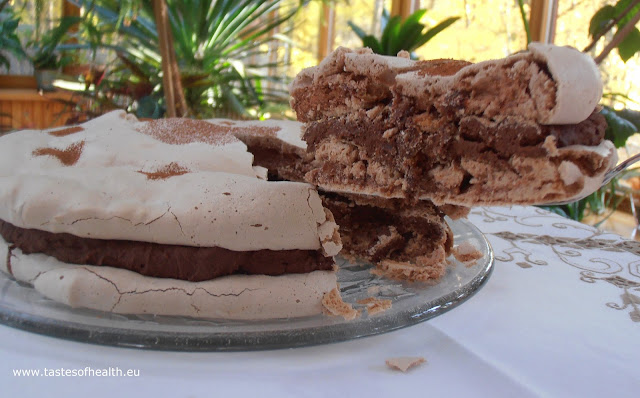
The cake I enjoyed so much consisted of meringue with dried figs and dates, and dense, dark chocolate filling. When I finally decided to prepare it, I knew I wouldn’t have a problem with making the meringue but the filing could possibly be problematical. I remembered I used to have a recipe for a butter cream that would match this cake very well but even though I searched every possible place, I couldn’t find it. So at the end I made the below filling instead. It was perfect and exactly like I wanted it to be: dark, intense with a pretty strong taste of alcohol. And because of the alcohol in the filing, this is ratter a grown-ups cake. It is also pretty heavy – even the members of my family with the sweetest tooth couldn’t have a second helping straight away (mind you, they did have a different cake at first ;)). But this is only a good news – you will be able to enjoy it longer!

INGREDIENTS (for 6-8 portions):

Meringue:
6 egg whites,
300g caster sugar,
2 tbsp Demerara sugar,
1 tsp white wine vinegar,
1 tsp cocoa powder,
a pinch of salt,
5 dates, thinly chopped,
5 dried figs, thinly chopped.

Filling:
250ml double cream,
200g chopped dark chocolate,
2 tbsp icing sugar,
75ml coffee liqueur,
5 dates, thinly chopped,
5 dried figs, thinly chopped.

Extra cocoa powder for dusting.

METHOD:
  1. Take two pieces of baking paper and draw 23cm-diameter circle on each one; then put them on two baking trays.
  2. Pre-heat an oven to 180 Celsius degrees.
  3. Put the egg whites to a big, clean and dry bowl, add a pinch of salt and beat them with an electric mixer.
  4. When they are stiff, start adding sugar (while you still beat the egg whites): add one tablespoon at a time and carry on beating for 20-30 seconds before you add another tablespoon of sugar. At first add the caster sugar and then the Demerara.
  5. When you have used all the sugar, keep on whisking for another 2-3 minutes, then add the vinegar and beat for another minute.
  6. Sieve in the cocoa powder, add the chopped dates and figs and gently stir.
  7. Divide the beaten egg whites into 2 portions and carefully spread them on the drawn circles, put both baking trays to the hot oven.
  8. After 5 minutes decrease the temperature to 140 Celsius degrees and bake for 90 minutes; afterwards turn off the oven, open its doors slightly and keep it open for 5 minutes. Close the door and keep the meringues in the oven for a few hours or overnight.
  9. In a small pot heat up the cream (but don’t boil it).
  10. Once hot, move away from the heat, add the chocolate and stir from time to time.
  11. When the chocolate is melted and combined with the cream, cool the mixture down and put to the fridge for approximately 1 hour so it thickens (but don’t allow it to thicken completely).
  12. Add the sugar and liquor to the cream and chocolate mixture and beat with the electric mixer until it increases in volume and becomes paler; stir in the dates and figs.
  13. Put one meringue disc (the worse looking one) on a serving plate, spread the chocolate filing and place the second meringue on top; decorate with sifted cocoa powder.
  14. Keep refrigerated till needed.
meringue, chocolate, dried figs, dates, recipe, recipes

meringue, chocolate, dried figs, dates, recipe, recipes


Friday, 9 October 2015

4 Ingredients Peanut Butter and Amaranth Bars [gluten free]


amaranth, peanut butter, chocolate, healthy diet, recipe, recipes, health, gluten free


When I was wondering who would like these bars the most, I couldn’t make up my mind. For obvious reasons this is a great option for peanut butter and chocolate lovers as well as everybody who has a sweet tooth. But including amaranth in this recipe and using high quality ingredients makes it a healthy treat so whoever is into healthy diet, will also be extremely happy with them. And also, you need only 4 ingredients and max. 15 minutes to make these bars so either people who don’t like complicated recipes or those who don’t like to (or can’t) spend too much time in the kitchen should be ecstatic as well.

So I still don’t know which group would like them the most. But what I do know is that my family loved them: they disappeared in no time!

INGREDIENTS (for 16 bars):

160g peanut butter,
100g honey,
30g amaranth popping,
100g dark chocolate (60% cocoa).

METHOD:
  1. Cover a bottom and sides of a small baking tray (I used 14 cm x 23cm) with baking parchment.
  2. Put the peanut butter and honey to a pan and warm up on a medium heat until runny (but don’t boil them).
  3. Add the amaranth popping and stir well.
  4. Transfer it into the prepared tin and smooth with the back of a spatula.
  5. Melt the chocolate in the microwave or over a pan of simmering water and pour over the amaranth mixture.
  6. Spread it and leave in the fridge for at least 30 minutes.
amaranth, peanut butter, chocolate, healthy diet, recipe, recipes, health, gluten free

These bars have been inspired by a recipe from www.simplyquinoa.com

Friday, 20 February 2015

Quinoa Chocolate Cake [gluten free]


quinoa, cake, chocolate, gluten free


When I came across a cake made of quinoa, I couldn’t imagine it would be so good as I had only used it previously for savoury dishes. I could understand using millet: sometimes we do have millet with fruit and honey for breakfast, I even bake a tart with millet. But a cake with quinoa?!

I was so curious that I simply decided to give it a try. The result was surprising and delicious: the cake was very moist and rich and you couldn’t taste the quinoa. It only gave a slight “bite” to the cake but this was in truth an extra value added to its texture.

If a thought of the wonderful taste of this cake hasn’t convinced you yet to bake it, maybe its healthiness will: it contains a super grain but it doesn’t include any flour or butter (I replaced it with healthy rapeseed oil). So what can be better than a piece of an (almost) guilt-free chocolate cake?

INGREDIENTS (for 8-10 portions):

130g quinoa,
250ml water,
dash of olive oil,
80ml milk,
4 eggs,
1tsp vanilla extract,
150ml rapeseed oil,
175g Demerara sugar,
85g cocoa powder,
1.5tsp baking powder,
0.5 tsp baking soda,
0.5 tsp salt.

Icing:
100g dark chocolate
100g white chocolate
6 tbsp milk,
optionally 0.5 tsp beetroot juice (or a few drops of pink food colorant)

METHOD:
  1. Prepare the quinoa: put it to a fine mesh strainer, rinse it under running cold water rubbing the seeds with each other with your fingers (for at least 1 minute) and drain well. Heat a drizzle of olive oil in a pot over a medium heat and fry the drained quinoa for about 1 minute till the rest of water evaporates. Add water, 0.25 tsp salt and bring to a boil. Lower the heat and cook covered for approx. 15 minutes. Take it out from the heat and let it rest covered for 5 minutes more. Fluff the quinoa with a fork. The quinoa has to be dry, in case there is still some water left, transfer it to a strainer and let it drain completely.
  2. Preheat an oven to 170 Celsius degrees (fan oven).
  3. Grease a 23cm loose-bottom cake tin with oil and line it with baking paper.
  4. In a food processor combine together milk, eggs and vanilla extract; add oil and cooked quinoa, whizz again until smooth.
  5. Sieve the cocoa, baking powder and baking soda to a bowl; mix it with the sugar and salt, add the quinoa mixture and stir it well.
  6. Pour the mixture to the tin and put to the hot oven. Bake for 40 minutes.
  7. Make the icing: melt each type of chocolate separately with 3 tbsp of milk in a heatproof bowl over a pan of boiling water (if you would like to get pink icing add the beetroot juice or the colorant to the white chocolate).
  8. When the cake is baked, take it out from the oven, leave it in the tin for 10 min. Afterwards put it on a plate and cool. Spread the dark icing and then pour the pink (white) icing in a decorative way.

Based on: Decadent Chocolate Cake by Mel’s Kitchen Cafe.


quinoa, cake, chocolate, gluten free

Tuesday, 10 February 2015

2 in 1 Valentine’s Cake [gluten free]


cake, Valentine's day, chocolate, raspberries, gluten free, recipe, recipes


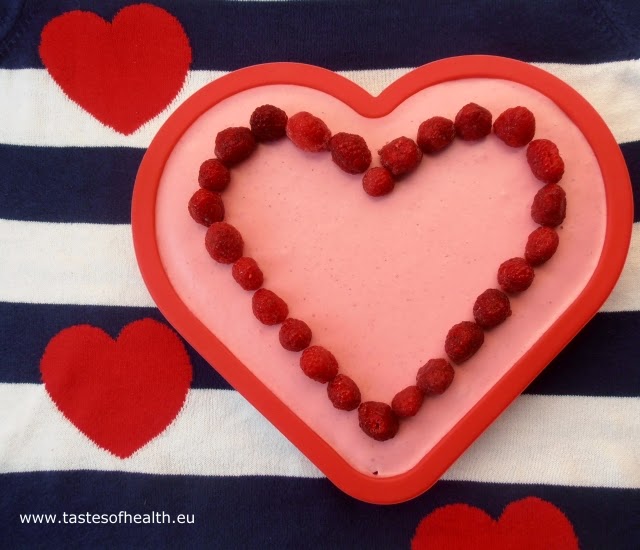
Right from the beginning I knew exactly what sort of a cake I wanted to make for the Valentine’s Day: it had to be a combination of chocolate and raspberries, it also had to be rich and heavy from one hand and light and airy from the other. Why such a combination? – Chocolate is supposed to be an aphrodisiac so it is perfect for such an occasion, raspberries are red and this is a colour of love. As far as textures are concerned, I was certain that - as per “the opposites attract” saying – these characteristics will work also for a cake!

I obviously wanted the cake to be of a heart shape but unfortunately the form I used was a bit too shallow (only 3.5cm high) so I was able to use only half of the raspberry mousse. Of course it wasn't wasted as even eaten by itself was delicious J. But I think it would be preferable to use the whole amount on top of the chocolate base, even if you were to make a sacrifice and not have the heart shape. At least this is what I am going to do next time to enjoy this Valentine’s Cake to the fullest.

INGREDIENTS (for 10-12 portions):

Chocolate base:
100g dark chocolate, broken into pieces,
2 tbsp rum,
90g butter in a room temperature,
120g sugar,
3 eggs, separated,
a pinch of salt,
50g ground almonds,
35g corn flour (or all purpose flour, if you don’t have to have a gluten-free cake),

Raspberry mousse:
500g raspberries (if frozen than they should be defrosted),
2 tbsp vanilla sugar,
6 sheets of gelatine (or 1 tbsp of gelatine powder),
500g double cream,
80g icing sugar,
extra raspberries for decoration.

METHOD:
  1. Put the chocolate and the rum to a bowl that is placed on top of a pan with barely simmering water; stir occasionally and melt.
  2. While the chocolate is cooling down, beat with an electric mixer the butter with half of the sugar till it is nice and creamy.
  3. Add the egg yolks; beat some more.
  4. Preheat an oven to 180 degrees and grease a baking tin. I used a silicon 29cm heart shaped form but it can be replaced by a 20-22cm diameter round tin with a removable bottom. If you are using the round tin, additionally put a disc of baking paper on its bottom.
  5. Whisk the egg whites with the salt until soft peaks form; add the rest of sugar and whisk till stiff.
  6. Add to the butter mixture the cooled down melted chocolate and the ground almonds, stir well.
  7. Now add 1 tbsp of whisked egg whites and 1 tbsp of the flour, stir gently. Repeat till you have used all the flour; at the end add the rest of the whisked egg whites and mix gently again.
  8. Pour the batter to the prepared form, put it to the oven and bake for 20 minutes.
  9. Put the raspberries to a blender and liquidise them; then press through a fine sieve to eliminate the pits and mix with the vanilla sugar.
  10. Prepare the gelatine as per its packet instruction.
  11. Whisk the double cream until stiff, slowly add the sugar.
  12. Add a few tablespoons of the liquidised raspberries to the pan with dissolved gelatine, stir and then add the rest of the raspberries.
  13. Combine the cream with the raspberries.
  14. Keep the baked base in the tin and when it is cold, pour the raspberry mousse to the tin, smooth the top and put the cake to the fridge for a few hours, preferably overnight.
  15. When set, decorate with raspberries.
cake, Valentine's day, chocolate, raspberries, gluten free,


Thursday, 11 December 2014

Luxurious Chocolate Florentines


chocolate, florentines, cornflakes, peanuts, cookies, biscuits, recipe, recipes


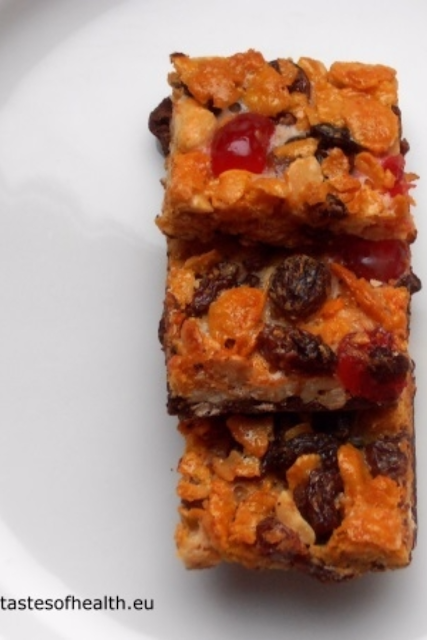
These are perfect treats for this special season but in truth – for any season. Obviously they cannot be easily put to a healthy food category but if we really wanted to, we could find health benefits of some ingredients (e.g. dark chocolate is a source of magnesium after all). But we really don’t have to as the taste of these Florentines speaks for itself: they are chewy and crunchy at the same time, sweet and simply wonderful. 

It was my father-in-law who called them “luxurious” as they are not the thin and tiny Florentines  you may get with a cup of coffee in some coffee shops: they are thick and generous, they are luxurious in taste and in size! There is also another great advantage of these Florentines – they are really quick and easy to make and could be almost entirely (maybe except for melting the chocolate and cutting) prepared by a few year old child.

INGREDIENTS:

300g dark chocolate broken into pieces,
3 cups crushed cornflakes,
1 cup raisins,
0.75 cups roasted unsalted peanuts
100g read glace cherries,
1 cup sweetened condensed milk.

METHOD:
  1. Melt the chocolate in the microwave or over a pan of simmering water.
  2. Line a base and sides of a 30x40cm baking tray with greased aluminum foil (you will probably need 2 sheets of foil, they should overlap).
  3. Spread the chocolate evenly over the aluminum foil and then put the tray to a fridge till the chocolate sets completely.
  4. Preheat an oven to 180 Celsius degrees (160 for a fan oven).
  5. In a big bowl combine the rest of the ingredients and mix well.
  6. Spread the mixture evenly over the set chocolate base; use back of a tablespoon to press it down.
  7. Bake for 15-20 minutes.
  8. Take the tray out from the oven, let the Florentines cool down completely (the chocolate base must be set again) and cut into squares.
chocolate, florentines