Wednesday, 22 July 2015

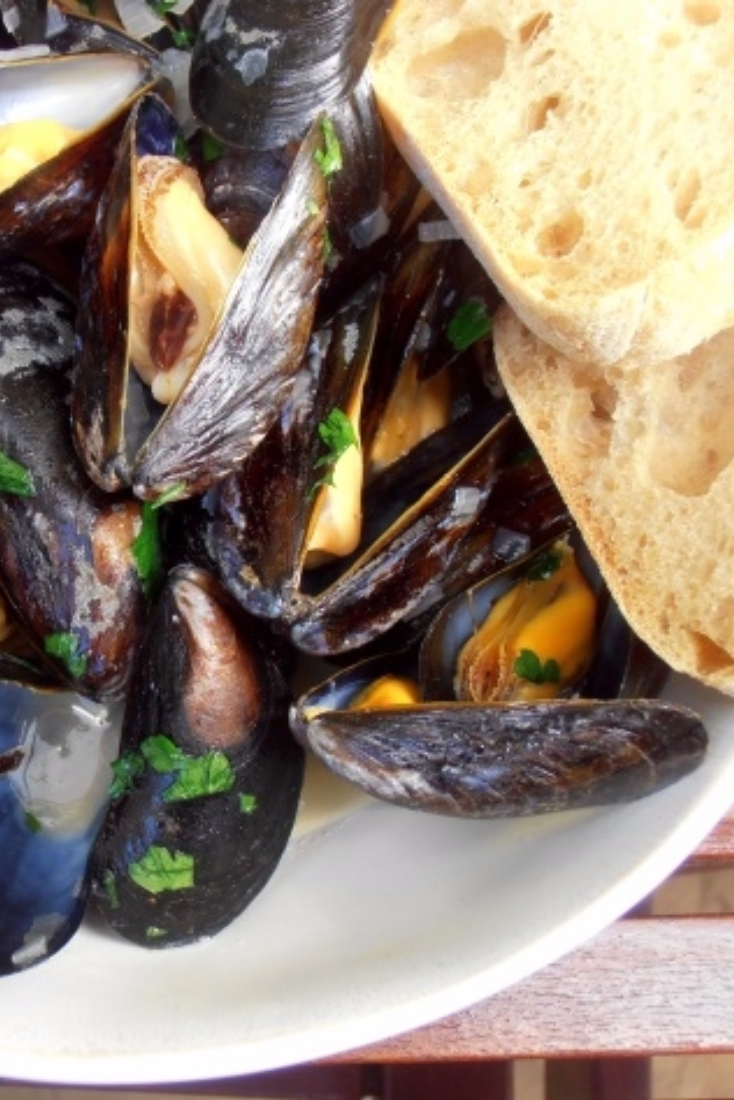
Mussels in White Wine Sauce


mussels recipe, cooking mussels, mussels, how to clean mussels


I don’t know about you, but there have always been meals that I have been scared to prepare. I either think that a recipe is so complicated that I would spend hours making the dish, or that the ingredients are too difficult to handle. One meal that consistently scared me was cooking mussels.

However, one day I decided to finally face my fears and bought those mussels. And I realized that they aren’t as difficult as I thought! Though it takes some time to get the mussels ready, the method is not hard at all. So, how to clean mussels? First, they have to be rinsed. The opened ones should be tapped on the kitchen surface, and if they close then they can be used; if they stay open it means they are dead, and should be thrown away with the damaged mussels. Next, all of the closed mussels should be cleaned and rinsed again. Once the mussels are ready to use, it takes only several minutes to cook this delicious meal.

INGREDIENTS (for 2 portions):
1 kg mussels,
1 tbs butter,
2 shallots, finely chopped,
125ml white wine,
1 bay leaf,
1 tbsp chopped parsley.

METHOD:
  1. Prepare the mussels:                                                                               * rinse them very well in cold water.
    * take a mussel: if it is damaged, discard it straight away and if it is open, give it a vigorous tap. If it stays open, discard.
    * if a mussel is closed (or closes after tapping), wash it and scrape off with a knife any barnacles; remove “beard” that may be between the two shells.
    * repeat the above with all the mussels.
    * rinse all of them again.
  2. In a big pan (big enough for all the mussels) melt the butter, add the shallots and cook over low heat for 3-5 minutes until translucent.
  3. Pour in the wine, add the bay leaf and bring to boil.
  4. Add the mussels, cover the pan tightly with a lid and steam on a high heat for 5 minutes, shake the pan vigorously 1-2 times in between.
  5. Remove the bay leaf and any unopened mussels; add the chopped parsley, stir and serve straight away with baguette to mop up the sauce.
The recipe was adapted from “The New Fish Cooking Encyclopedia” by Kate Whiteman.


mussels recipe, cooking mussels, mussels, how to clean mussels


Friday, 17 July 2015

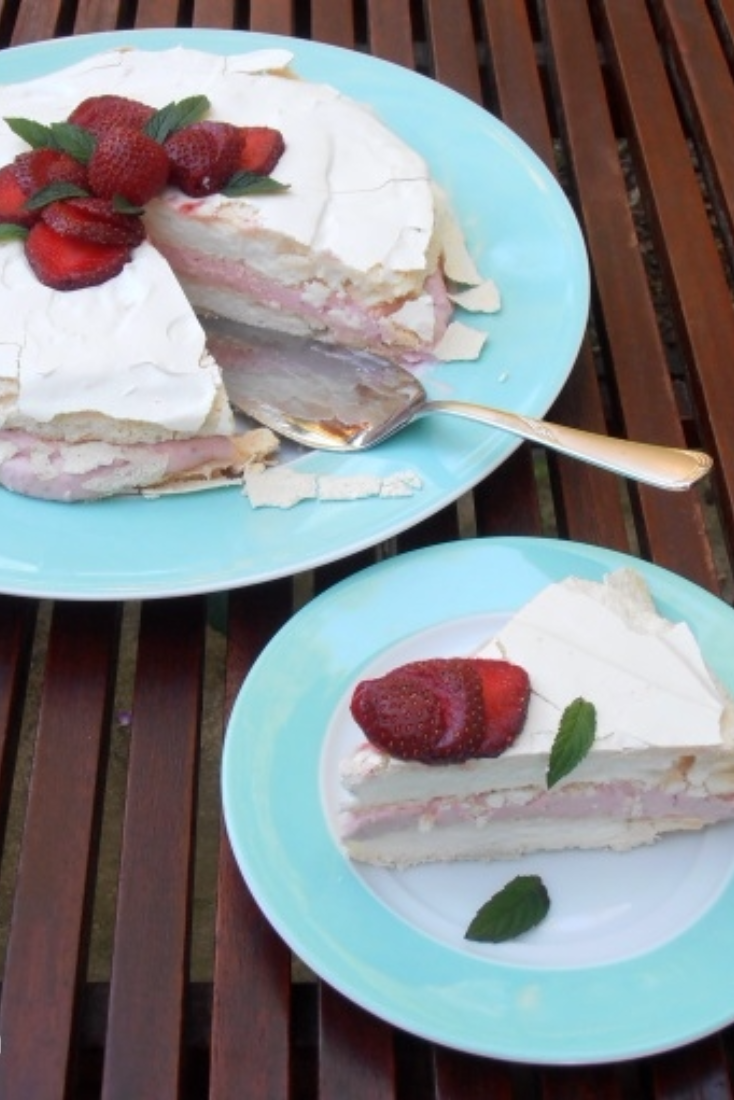
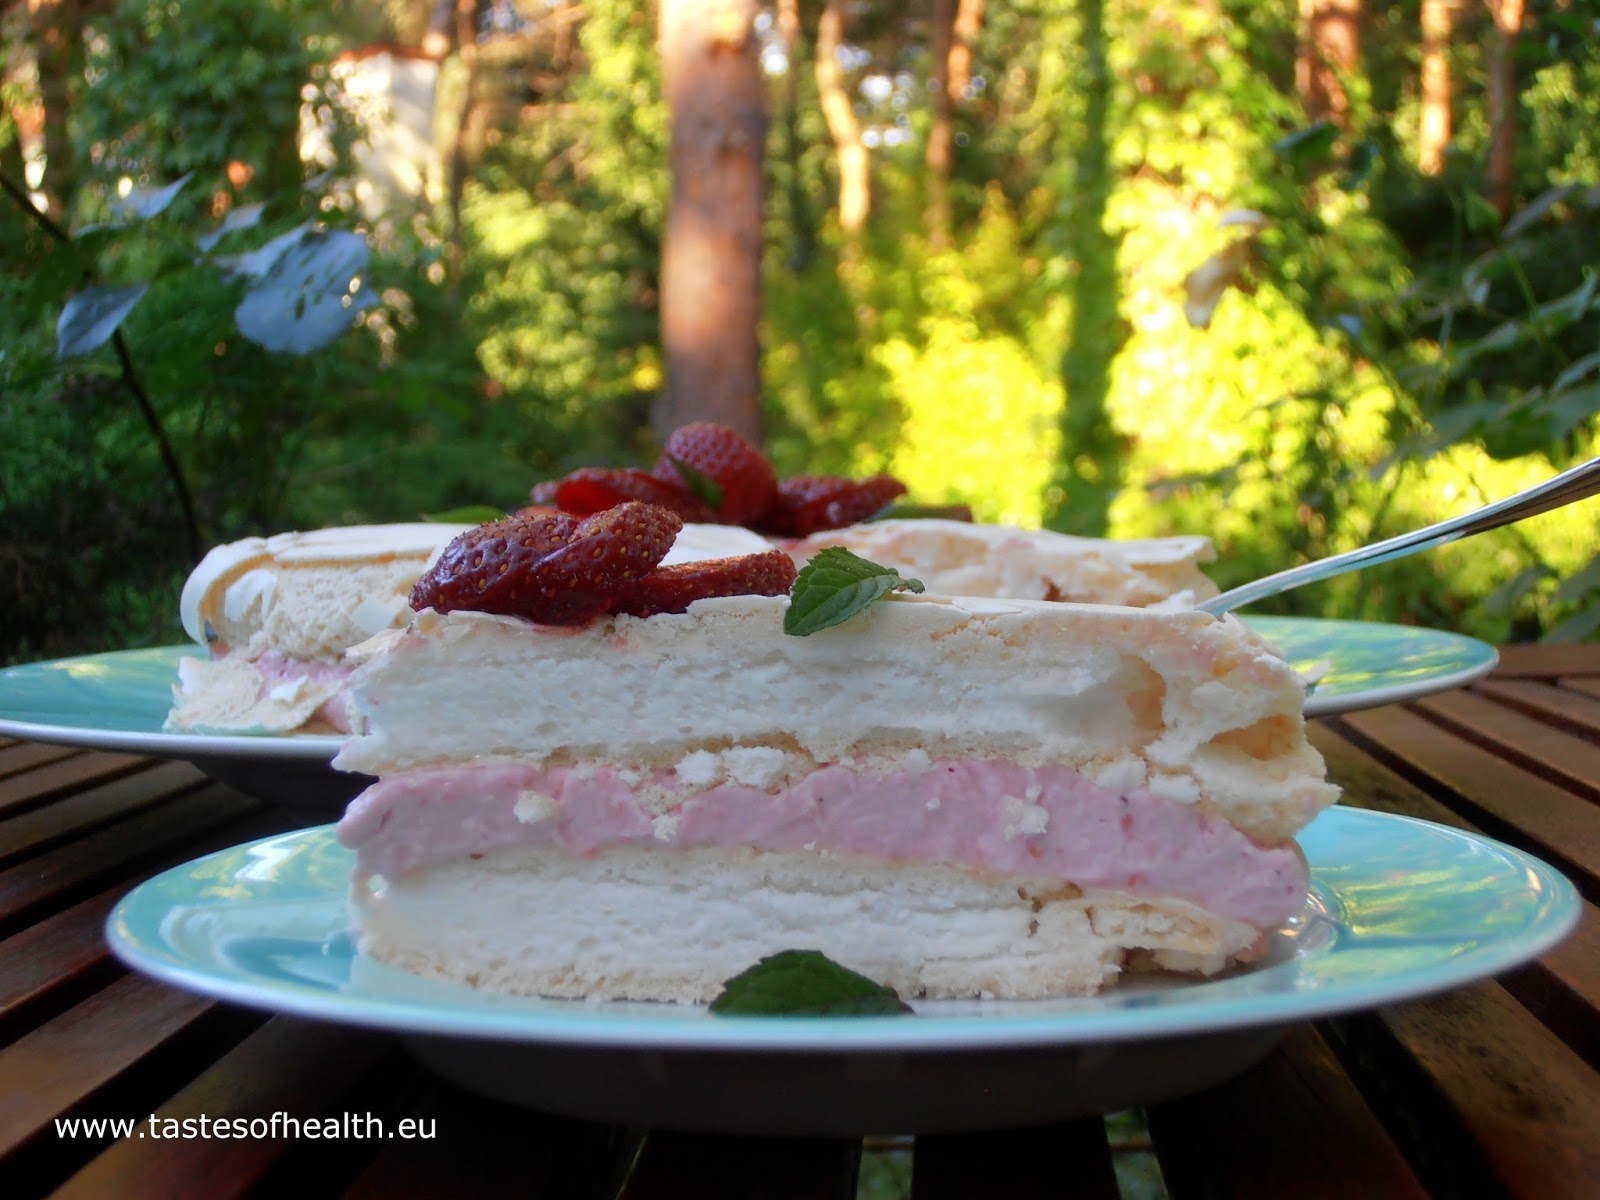
Meringue Cake with Strawberry Cream


meringues, cake, strawberry, recipe


Meringues are one of my favourite types of cake, and honestly I could have them a few times a week. However, due to the high sugar and calorie content, I try to restrict myself – but every now and then I either make a meringue cake, or have it as a special treat.

Some time ago I had a wonderful strawberry meringue in a restaurant, and I really wanted to make it myself. I had made meringues before, so that part was not an issue; but the cream was a different story. I wanted it to taste of strawberries, but too many liquidized strawberries could make the cream too runny and the cake would lose its shape. I had to have a few trials before I managed to get the right proportion of ingredients to get a delicious cream – but all the effort was definitely worth the final result!

INGREDIENTS (for 6-8 portions):

Meringue:
4 egg whites,
200g caster sugar,
1 tsp white wine vinegar,
a pinch of salt.

Cream:
250g strawberries plus a few more for decoration,
6 tbsp icing sugar,
125g mascarpone cheese,
150ml double cream.

METHOD:
  1. Take two pieces of baking paper and draw 20cm-diameter circle on each one; then put them on two baking trays.
  2. Pre-heat an oven to 180 Celsius degrees.
  3. Put the egg whites to a big, clean and dry bowl, add a pinch of salt and beat them with an electric mixer.
  4. When they are stiff, start adding sugar (while you still beat the egg whites): add one tablespoon at a time and carry on beating for 20-30 seconds before you add another tablespoon of sugar.
  5. When you have used all the sugar, keep on whisking for another 2-3 minutes, then add the vinegar and beat for another minute.
  6. Divide the beaten egg whites into 2 portions and carefully spread them on the drawn circles, put both baking trays to the hot oven.
  7. After 5 minutes decrease the temperature to 140 Celsius degrees and bake for 90 minutes; afterwards turn off the oven, open its doors slightly and keep it open for 5 minutes. Close the door and keep the meringues in the oven for a few hours or overnight.
  8. Liquidize the strawberries, press them through a fine sieve, add the sugar and stir till the sugar dissolves.
  9. Put the mascarpone to a bowl, beat with the electric mixer on low speed and add 14 tablespoons of liquidized strawberries*.
  10. Whisk the double cream till stiff and gently stir with the mascarpone and strawberry mix till combined.
  11. Put one meringue disc (the worse looking one) on a serving plate, spread the strawberry cream on it and place the second meringue carefully on top, decorate. If you prefer, you may keep some of the cream and use it to decorate the top of the cake.
  12. Keep refrigerated till needed.

* You may end up with more liquidized strawberries then needed. However you should add only 14 tablespoons, otherwise the cream might be too runny.


Meringue, Cake, Strawberry


Thursday, 16 July 2015

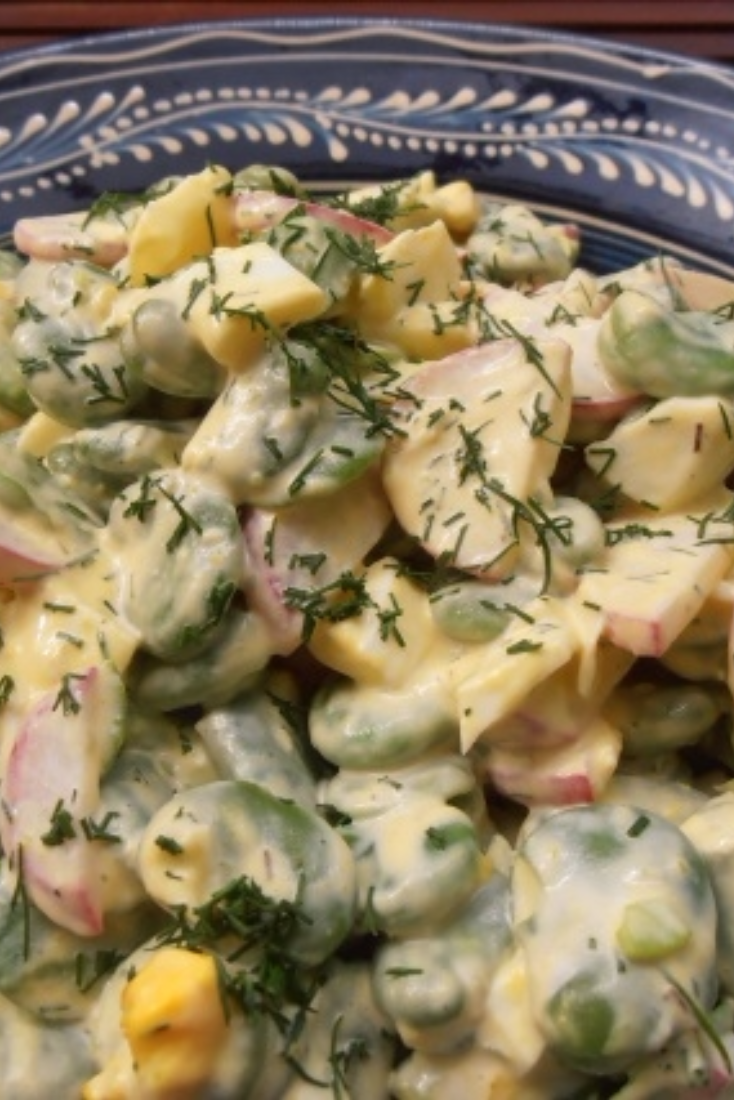
Broad Bean, Egg and Radish Salad [vegetarian]


salad, vegetarian, broad beans, healthy snack


I remember having broad beans as a snack when I was a child. During the summer, when we visited my paternal grandparents, there would always be a big bowl of broad beans cooked simply with salt waiting for us at the table. We would all help ourselves, pop the beans out from their skins, and eat them while we were talking. Such a simple, yet delicious and healthy snack!

A few years ago my mother started using broad beans in a salad with dill and thin strips of ham. I loved (and still love) that salad a lot but I have a vegetarian at home, so I had to change it slightly. Instead of ham, I use boiled eggs; and because eggs go well with radishes, I also add them to the salad.

INGREDIENTS (for 6 portions):
1 kg podded broad beans,
4 eggs,
10 radishes,
A few dill sprigs,
1 tbsp plain yoghurt,
2 tbsp mayonnaise,
salt and pepper.

METHOD:
  1. Rinse the broad beans, put them to a pan and cook in salted water for 4 minutes.
  2. Cook the eggs for 8 minutes.
  3. When the broad beans are cooked, drain the hot water and immediately cover them with cold water. Leave for 2-3 minutes, drain again and squeeze them from their skins.
  4. When the eggs are cool enough to handle, peel them and chop; then add to a bowl with broad beans.
  5. Slice the washed radishes and thinly chop the dill; add to the bowl together with yoghurt, mayonnaise and seasoning, mix everything and preferably leave for 30 minutes to cool down.
salad, vegetarian, broad beans, healthy snack


Friday, 10 July 2015

Sponge Cake with Strawberry Mousse [Birthday Cake]


sponge cake, strawberry cake, cake decorating ideas, birthday cake, sponge, strwaberries, recipe, recipes


I don’t know about you but a sponge cake with whipped cream and strawberries is a summer classic for me and I have made it many times. This time however I wanted to add a twist to it and instead of adding slices/pieces of strawberries on top of whipped cream, I wanted to mix everything together to make strawberry mousse. The idea was really good - the mousse was delicious - the only issue was that it wouldn’t be stiff enough so I had to add gelatin but obviously that was not a big problem.

While I was making this strawberry cake I also wanted to try out a cake decorating idea I had seen somewhere else some time ago. I am really happy it worked for me perfectly the first time I made it, as I had not seen the decoration made before. However I think it may have been beginner’s luck and when I make it next time, I will certainly take extra steps to ensure the decoration is not damaged in the future, while I open the tin (details on how to make the pattern on the edge – below). Although I made it without any special occasion, I think it looks great enough to be a birthday cake.

INGREDIENTS (for 8-10 portions):

Cake:
4 eggs, white and yolks separated,
100g icing sugar,
150g plain flour,
0.5 tsp baking powder

Mousse:
300g strawberries (plus some more small, equal size strawberries for decoration),
6 tbsp icing sugar,
2 heaped tsp gelatin,
5 tbsp hot water,
300ml double cream,
Additionally: 1 new plastic document folder.

METHOD:
  1. Preheat an oven to 180 Celsius degrees (160 degrees for fan ovens).
  2. Put a piece of baking paper on the bottom of a removable-bottom 18cm diameter cake tin (no need to cut a disc out, the edges can stick out as it will be easier to take the sponge out).
  3. Put the egg whites into a big bowl, whisk them with an electric mixer till stiff, slowly add the icing sugar and beat a bit longer.
  4. Mix the egg yolks with a fork (just to break them), add them to the whisked whites and gently stir.
  5. Gradually add the flour mixed with the baking powder and gently stir with a spoon or spatula.
  6. Pour the batter to the tin, put it to the hot oven and bake for 30-40 minutes until an inserted wooden stick comes out dry.
  7. Liquidize the strawberries, press them through a fine sieve to remove the seeds, add 3 tbsp of icing sugar and stir.
  8. Whip the cream with electric mixer until light and fluffy, add the rest of icing sugar (3 tbsp) and stir well.
  9. Mix the gelatin with the hot water in a cup. If it doesn’t dissolve easily, put the cup into a bowl with boiling water and stir it constantly.
  10. Add a few spoons of the liquidized strawberries to the dissolved gelatin, stir it and pour it to the rest of strawberries, stir again and gently combine with the whipped cream.
  11. Take the cold sponge out from the baking tin and cut horizontally in half.
  12. Cut open the plastic folder alongside its bottom, then cut in half along the longer side so you end up with 2 long strips.
  13. Line the sides of the tin with the plastic strips overlapping each other and place the bottom half of the cake back in the tin.
  14. Cut the strawberries in half and start placing them one by one on the edge of the cake so that the cut part touches the plastic lining the side of the tin. While you do it, press the strawberries gently into the cake so they stay vertical.
  15. Pour the mousse on top of the cake and spread it making sure the strawberries stay in place (next to the edge of the tin). You can keep a few tablespoons of the mousse and spread it on top.
  16. Place carefully the top part of the cake on the mousse and decorate it with strawberries or the leftover mousse.
  17. Put the cake to a fridge to set for at least 2 hours.
  18. Before serving, take the cake out from the fridge, open and lift the side of the tin and gently remove the plastic strips. This way you can be sure the edges and the pattern will not be damaged.
sponge cake, strawberry cake, cake decorating ideas, birthday cake,

sponge cake, strawberry cake, cake decorating ideas, birthday cake,


Thursday, 9 July 2015

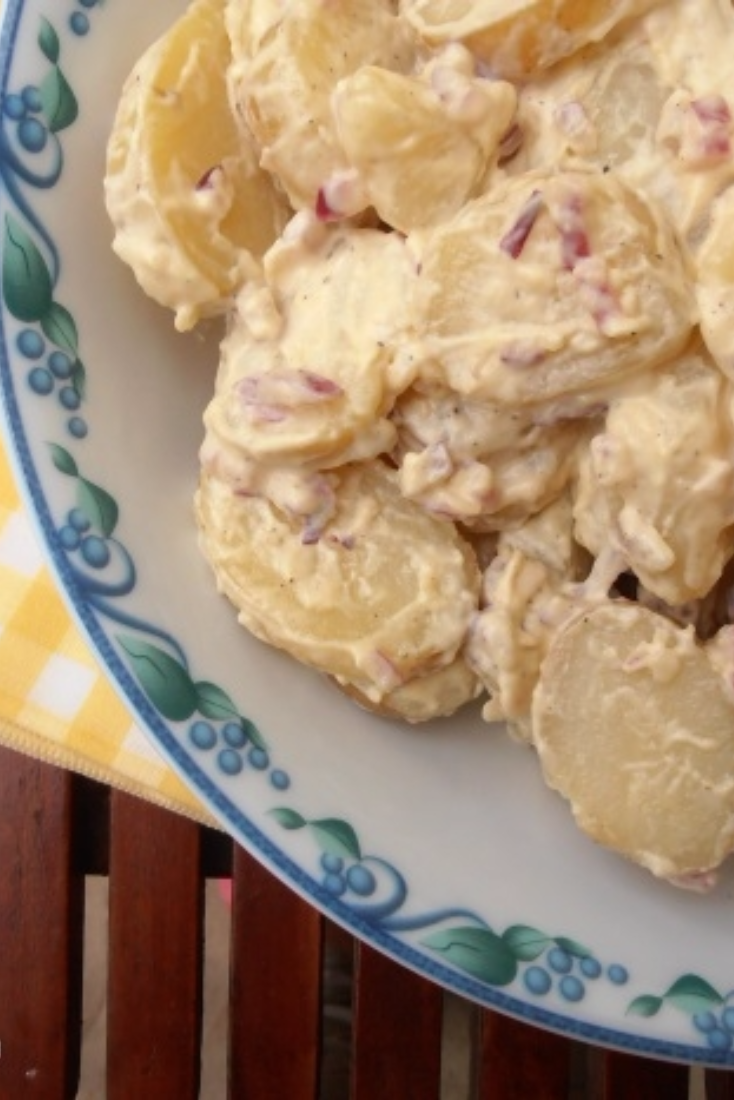
Potato Salad [vegetarian]


Potato, potato salad, potato salad recipe


I come from a country where potatoes have always been a staple food. In the past and even nowadays lots of Polish people – especially the older ones – couldn’t imagine having their portion of meat/fish for lunch or dinner without potatoes. I personally didn’t like potatoes for a long time so you can imagine how difficult it was for me to enjoy a meal-time, when I was a child.

Although there are many Polish recipes that use potatoes, I only had a chance to try potato salad when I was abroad. I liked it very much so straight away I started looking for a perfect Potato Salad Recipe. Since the beginning of my search I have tried many different potato salad recipes and I must admit the below one is really excellent and this has been confirmed many times by my family and guests: if I serve it along with a few other salads, this one would be finished the fastest!

INGREDIENTS (for 4-6 portions):
1.5kg new potatoes or salad potatoes, preferably equal size,*
1 tbsp Dijon mustard,
2 tbsp white wine vinegar,
3 tbsp olive oil,
1 red onion finely chopped,
4-5 tbsp mayonnaise,
salt and pepper.

METHOD:
  1. Wash the potatoes very well (if you prefer, you may scrub them); cut them into approx. 1 cm slices, put to a big pan and cover with boiling water; add 1 tsp salt and cook for 7-12 minutes till just (but not too) soft. Cooking time depends on potato’s type and size. To avoid overcooking, after approx. 7 minutes of cooking, check them frequently with a fork.
  2. Put to a small bowl the mustard, vinegar and olive oil, whisk everything together.
  3. Drain the potatoes, cool them for 5 minutes, add the dressing and chopped onion, mix gently** and leave for at least 30 minutes.
  4. Add the mayonnaise, season and mix gently**.
* If your potatoes are not equal, when you slice them try to cut them so the pieces will be more or less of the same size. This way you will also avoid the situation that some potatoes are over- and some undercooked.

** When you mix the salad, you have to do it very gently not to break the slices. I do it with my hands.

Potato, potato salad, potato salad recipe


Friday, 3 July 2015

Strawberry Jam [Confiture]


Strawberry jam recipe, how to make jam, strawberry jam, strawberry, preserve, confiture


I was hesitant about including this Strawberry Jam recipe on my blog. And it was not about me being uncertain of the taste as the confiture is indeed tasty. I was just unsure how many people would be interested in spending 2-3 days preparing it. I was also aware that some people might have been put off by the amount of sugar used to make this preserve.

But the 2-3 days doesn’t really mean slaving for 48-72 hours in the kitchen as you only need to spend 30-60 minutes each day and most of that time is about keeping an eye on the jam while it cooks.  And as far as the amount of sugar is concerned, if you want to have real confiture that keeps for longer (till the next strawberry season), you simply have to use that amount. And the taste of homemade jam simply cannot be replaced by anything else!

So if you feel like trying to check how to make jam, please do and let me know about your experience. I can tell you it took me a long time to get ready to make it for the first time – it was only just 3 years ago. But since then I can imagine neither June/July without making it nor a long winter without enjoying toast or pancake with Strawberry Confiture as this reminds me of a sunny and warm summer.

INGREDIENTS (for approx. 3 jars):
1kg strawberries,
800g sugar,
1 lemon (juice and peel).

METHOD:
  1. Put the strawberries into a colander, rinse them thoroughly under running cold water, drain and preferably leave them for some time to dry.
  2. Once ready, remove the green tops, transfer to a non- metallic bowl and cover with sugar; leave for several hours/overnight.
  3. The next day move the strawberries with sugar to a pan, add the lemon juice and rind, bring to boil; lower the heat and cook for 30 minutes. If you have to stir the jam, do it gently so you don’t break the strawberries. Additionally if there is scum on top, please remove it.
  4. Leave the jam in a cold place for approx. 24 hours.
  5. The next day remove the strawberries from the syrup (the lemon rind should be left in the liquid), keep them aside and bring the syrup to a boil.
  6. Boil it on a medium-high heat for 30 minutes, add the strawberries back and boil for 10-20 minutes more until the Confiture reaches the right consistency.*
  7. Pour the Confiture to prepared jars**, cover with lids, seal and put all the jars upside down on a towel, then cover them with the towel tightly. If you spill any of the Confiture on top of the jar, clean it well.
  8. Keep the jars covered for a few hours, afterwards you can keep them in a cool place for up to a year.
* This is the way to check, if the Confiture has reached the correct consistency:
  • Put 2-3 saucers to a freezer for at least 30 minutes.
  • After you added the strawberries to the syrup and you boiled everything for 10 minutes (step 6), take one saucer from the freezer, spoon a bit of jam on it and leave it for 1-2 minutes. If there is a skin on top that wrinkles when you touch it, the Confiture is ready. If not, you have to cook it longer and re-test.
** There are many ways to prepare (sterilize) jars but this is the one I have already used for a few years:
  • wash jars and lids very well,
  • put them to a big bowl,
  • a minute or so before you are ready to put your jam to jars, pour boiling water to the bowl with jars,
  • after at least 30 seconds gently take one jar from the bowl and pour in the Confiture.
  • The jars will be very hot so you have to use an oven glove to hold them.
Strawberry jam recipe, how to make jam, strawberry jam, strawberry, preserve, confiture


Thursday, 25 June 2015

Beetroot and Apple Soup [vegetarian]


beetroot, beetroot soup, soup, vegetarian

If you had asked me a few months ago about beetroot soup, I could have probably come up with only three types: traditional Polish clear beetroot soup “barszcz” which can be served with little dumplings, Ukrainian borsch, and a cold beetroot soup with yoghurt which is called “chlodnik”. However, this changed recently when I went to a restaurant and tried a really delicious and different beetroot soup.
I liked it so much that I decided to re-create it in my own kitchen. Since the soup was liquidized, I obviously didn't know any of the ingredients other than beetroot so I had a bit of a riddle. I still am not sure if the taste of my soup is similar to the one tried in the restaurant, but I was pretty happy with my result!
INGREDIENTS (for 4 portions):

3-4 (650g) beetroot,
1 red onion,
2-3 (600g) apples,
0.5l vegetable stock,
1 tbsp honey + 2 tsp optionally for drizzling,
salt and pepper,
some walnuts broken into pieces and crumbled goats cheese for garnish.

METHOD:
  1. Preheat an oven to 180 Celsius degrees (fan oven).
  2. Wash the beetroot, dry it and wrap tightly with aluminium foil, put to the hot oven for 30 minutes.
  3. Peel the onion, cover with foil and put to the oven next to the beetroot for further 15 minutes.
  4. Cut the apples in halves, cut the cores, put the matching halves together and wrap tightly with foil, put to the oven along with beetroot and onion for 45 minutes.
  5. Peel the beetroot and apples, put to the food processor with the onion  and process on high till smooth.
  6. Combine with the stock, bring to boil, add 1 tbsp honey and the seasoning.
  7. Serve the soup with walnuts and goat’s cheese.


beetroot, beetroot soup, soup, vegetarian


Friday, 19 June 2015

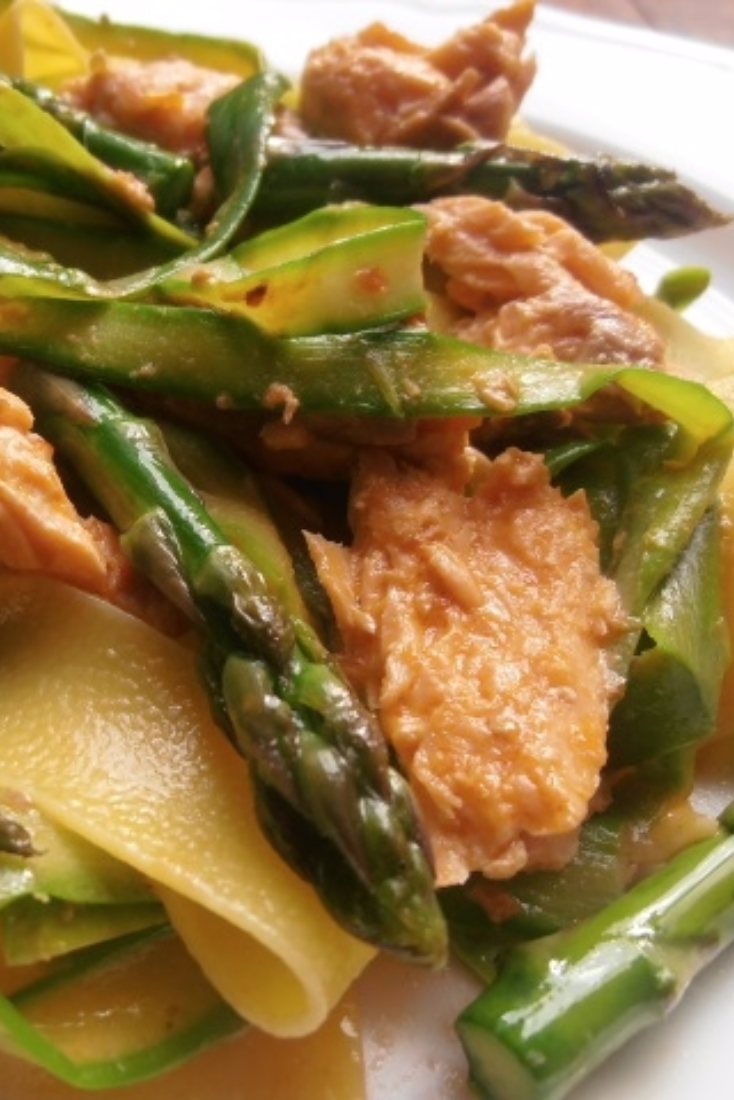
Asparagus Pappardelle with Salmon in Red Pesto Sauce


asparagus, pappardelle, salmon, pesto, pasta


I love pasta and I love asparagus. So it was only a matter of time before I would combine them together so that I could reach a higher level of foodie heaven. But you cannot go to heaven, if you sin too much with your calories! This is why I decided to use a clever trick (and a potato peeler) to shave asparagus into ribbons that resemble pappardelle (or at least its thinner cousin - tagliatelle).

Thanks to that trick, I used much less pasta than I would have normally cooked, and the portions still looked big, but were less calorific and healthier. Oh, and have I mentioned yet that it was delicious?

INGREDIENTS (for 4 portions):
500g green asparagus,
1 tbsp olive oil,
500g skinless and boneless salmon fillet,
250g pappardelle,
2 tbsp red pesto,
6 tbsp double cream,
salt and pepper.

METHOD:
  1. Snip the hard ends of washed asparagus, cut 4-5 cm of the tops and shave the other parts of asparagus with a potato peeler into ribbons.
  2. In a frying pan heat up the olive oil, add the asparagus tops and fry them for 2 min, put aside.
  3. In the same frying pan fry over a medium heat the seasoned salmon fillet for 5 minutes on each side (or a bit longer, if the fillet is thick).
  4. Put the fish on a plate, flake it.
  5. Cook the pappardelle in salted water as per packet instruction, 1 minute before the end of cooking add the asparagus’ ribbons; keep half a cup of the cooking water.
  6. On a low heat warm up the pesto and cream, add the flaked salmon and the asparagus tops, heat up and gently stir with pappardelle and asparagus ribbons. If it is too dry, add a few tablespoons of pasta cooking water.


asparagus, pappardelle, salmon, pesto, pasta

Thursday, 11 June 2015

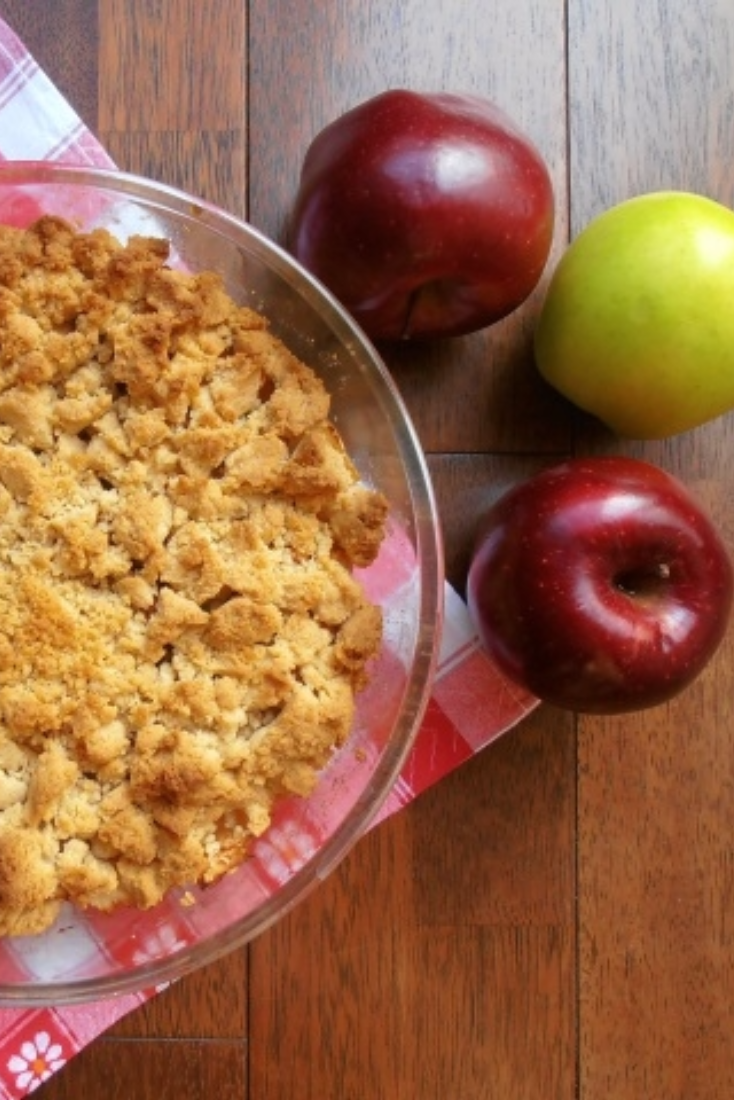
Apple Crumble


Desserts, easy dessert recipes, apple, apple crumble


If it is not the favorite, Apple Crumble must be one of the top 5 favorite desserts in our house. I usually make it just for 4 of us as a grand finale of our Sunday lunch, but I  also make it when we have guests, as its simplicity is inversely proportional to its deliciousness.

My love for crumbles dates back to my childhood when my Grandma often baked a yeast cake with seasonal fruit and crumble on top. I remember pinching the biggest pieces of crumble when the cake was already baked. I have to admit that I also remember pinching the biggest pieces of crumble even before the cake was baked! And ”the biggest piece of crumble” is a key word here. When I make the crumble I make sure the pieces are big as we all love them  that way. So if after processing the crumble I don’t end up with the desired size, I simply put them together manually.

INGREDIENTS (for 4-6 portions):
6 apples,
1 tsp cinnamon,
2-4 tbsp sugar,
175g flour,
100g cold butter plus a bit more for greasing,
85g demerara sugar,
85g ground almonds.

METHOD:
  1. Preheat an oven to 180 Celsius degrees (160 for fan oven).
  2. With a bit of butter grease an oven proof dish.
  3. Peel, core and slice the apples; mix them with cinnamon and sugar. The amount of sugar to be used depends on the apples:  if I use sweet apples sometimes I don’t add any sugar at all.
  4. In a food processor whizz the flour, butter, demerara sugar and ground almonds until crumbly.
  5. Spread the crumble evenly on top of the apples, put to the oven and bake for 30-40 minutes till the crumble is golden.
Desserts, easy dessert recipes, apple, apple crumble


Thursday, 4 June 2015

Asparagus and Mushroom Soup [vegetarian]


how to cook asparagus, asparagus, soup, vegetarian, asparagus soup


I have always preferred green asparagus, mainly because it is easier to prepare. You can just cut away the  woody end of its stem, but I prefer to bend its bottom part till it breaks. Then, it breaks just in the right place so you end up with the nice and tender vegetable without the woody part.

White asparagus is trickier: not only do you have to remove woody ends, but you also have to peel it, as its skin can be very stringy. But it has more delicate taste then the green one due to the way it is grown: white asparagus is cultivated underground to stop chlorophyll development.

When you prepare white asparagus, you have to be very careful as it not only has delicate taste, but it also has a delicate texture and  breaks easily. Luckily, in this recipe, you do not need to worry about it as - except for the top ends – all the other parts should be chopped as the soup will be liquidises anyway. So maybe this soup will be for me a beginning of a new relationship with white asparagus?

INGREDIENTS (for 4 portions):
500g white asparagus,
300g mushrooms,
1l vegetable stock,
50ml milk,
1 tbsp butter,
salt and pepper.

METHOD:
  1. Snip the woody endings of the asparagus, peel it and cut into 3-4 cm pieces (keep the top ends separately).
  2. Wash, dry and slice the mushrooms. Keep some slices aside together with the asparagus tops for garnish.
  3. Pour the stock into a pot, add the vegetables and cook the soup for approx. 15 minutes until the vegetables are soft.
  4. Add the milk, adjust the seasoning and liquidize the soup. If you want to make sure there are no stringy pieces of asparagus, strain the soup through a sieve.
  5. In a frying pan melt the butter on a medium heat, add the asparagus tops and mushroom’s slices and fry them stirring for 2-3 minutes until the mushrooms are golden.
  6. Serve the soup garnished with the fried vegetables.