Friday, 29 January 2016

Peking Duck


Peking duck, Chinese, Chinese food, Peking duck pancakes, hoisin, hoisin sauce, crispy duck pancake

I can’t really say which cuisine is my favorite one but Chinese is for sure in my top 3. I love it for the different stir fries, variety of dumplings and for the one and only Peking Duck. I used to have it only in restaurants as I thought it was really difficult to prepare. But then one day I came across a recipe for this dish that seemed really easy, and gave it a try. It was really very good. But then, I read a bit more about Peking Duck preparation and adjusted the recipe accordingly. And although I am sure Chinese restaurants have their special tricks to prepare it, the duck cooked as per the instructions below is really easy to make and tastes like it came straight from a very good Chinese restaurant.

I do make Peking duck just for 4 of us but it is also a great dish to serve (with other Chinese starters) to a group of people: everything can be prepared in advance, the duck will be ready exactly when you want it to be and it takes only minutes (or seconds, if you use a microwave) to steam the pancakes just before serving.  And it is fun for the guests to roll their own pancakes.

P.S. If you have a vegetarian among your guests, cut tofu into 2-3cm cubes, mix with some teriyaki sauce and marinate for at least 30 minutes. Then put to the oven with the duck for the last 20-30 minutes. My vegetarian daughter says it tastes almost as good as the real thing with all the trimmings and most importantly – it allows a vegetarian to participate in the special way of eating this meal.

INGREDIENTS (for 4 portions, or 6-8, if served with other dishes):

1 duck,
1 tbsp honey,
75ml warm water,
1-2 cucumbers cut into long, thin sticks,
1-2 bunches of spring onions, sliced into strips,
Hoisin sauce,

METHOD:
  1. Remove any feathers that are left and cut off the excess fat from the duck.
  2. Boil a kettle of water.
  3. Put the duck to a big bowl and pour boiling water over it (if necessary, turn the duck so the water can be poured all over it), keep in the hot water for 2-3 minutes, and then pat dry it completely with paper towels.
  4. Mix the honey with warm water and coat the duck’s skin in it (using a brush).
  5. Put the duck into a bowl and keep in a fridge for at least 4 hours or overnight. The duck should stay dry so use a bowl in which it can “stand”.
  6. Heat an oven to 170 Celsius degrees (150 for fan ovens).
  7. Put the duck (breasts up) on a roasting rack placed over a roasting tin and roast for 4 hours.
  8. Increase the temperature to 220 Celsius degrees (200 fan ovens) and roast for 30 minutes more.
  9. Carve/shred the duck’s meat including the crispy skin into small pieces and transfer onto a serving dish.
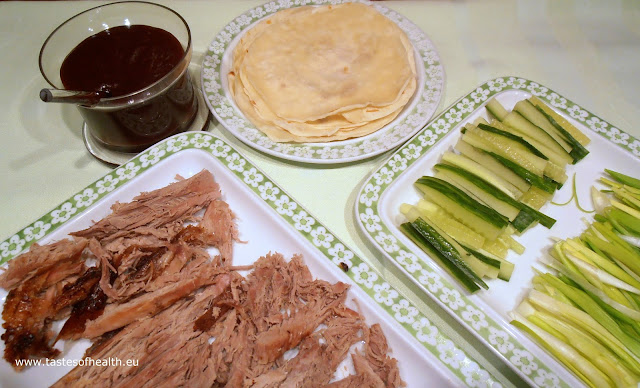
  10. Put separately on serving plates the cucumber, spring onions, hoi sin sauce and warmed up (steamed or microwaved) pancakes. If you microwave them, cover the plate with pancakes with cling film and microwave for approx. 30-40 seconds on Medium.
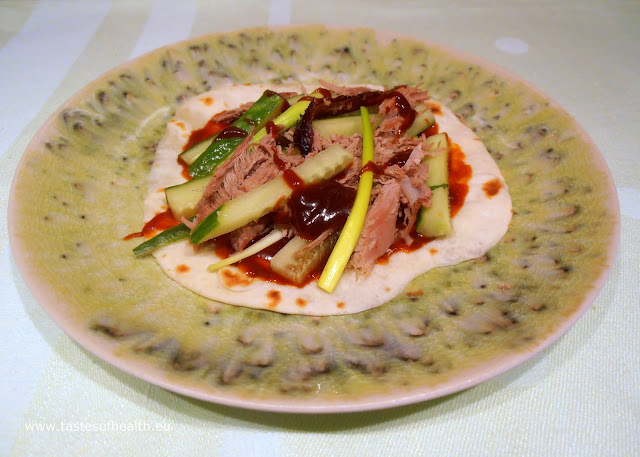
  11. When the meal is served, everybody helps themselves to a pancake, spreads a bit of Hoisin sauce on it, puts the pieces of cucumber, spring onions, duck and optionally a bit more sauce and rolls the pancake.

Peking duck, Chinese, Chinese food, Peking duck pancakes, hoisin, hoisin sauce, crispy duck pancake

Peking duck, Chinese, Chinese food, Peking duck pancakes, hoisin, hoisin sauce, crispy duck pancake


Subscribe to our Delicious and Healthy Recipes Newsletter

* indicates required


Wednesday, 27 January 2016

Pistachio Cookies [gluten free]


pistachio, cookies, cookie, biscuits, biscuit, pistachio cookies, Italian

Whenever I go on holiday or for a short break, I prefer to go to a different destination each time. There are simply so many wonderful places to visit and there are only so few days of holiday.  But I have some exceptions from this rule and Rome is one of them. I love this city, I could walk there for hours every day and it really doesn’t matter to me that I have already seen some of the places there several times.

While we were wandering around Rome a few years ago, we came across a bakery. It was really small and not fancy at all but the biscuits on the display looked really appetizing and - as we checked later – they tasted divine.  We ended up going there almost every day, we also recommended it to everyone who was going to Rome. Oh, I didn’t mention this was also Julia Robert’s favorite cookie place when she was filming “Eat, Pray, Love” in Rome.

So whenever we went to the Eternal City, this little bakery was a staple point to visit, almost like Fountain di Trevi or the Colosseum.  And then last year we found out it was not there anymore. Supposedly it moved to a different location but we never found it… We have missed all their biscuits so much that I knew I would have to try to recreate at least the favorite one: pistachio cookies. I adapted the below formula from an Italian recipe for almond biscuits. They are probably not the same as the original recipe, but I can assure you they taste wonderfully of pistachios and Rome.  

INGREDIENTS (for approx. 25 cookies):

250g pistachio nuts,
150g icing sugar,
2 egg whites,
extra icing sugar for coating.

METHOD:
  1. Process the pistachio nuts in a food processor until you get “pistachio flour”.
  2. Add the icing sugar and stir.
  3. Whisk the egg whites with the electric mixer till stiff.
  4. Gradually add the egg whites into the pistachio and sugar mixture; stir till all ingredients are combined and you end up with a sticky dough.
  5. Let the dough rest for 12 hours in a fridge.
  6. Preheat an oven to 160 Celsius degrees.
  7. Form small balls from the mixture (approx. walnut size), coat them in icing sugar, place on a baking sheet covered with parchment paper and flatten slightly.
  8. Bake in the hot oven for 15 minutes, the cookies shouldn’t get golden so they remain soft inside.
pistachio, cookies, cookie, biscuits, biscuit, pistachio cookies, Italian


Subscribe to our Delicious and Healthy Recipes Newsletter

* indicates required


Saturday, 23 January 2016

New Year's Resolutions - how to set goals [and stick to them for life]?

workout plans, fitness, losing weight, diet, healthy eating, change for life, goal, new year’s resolutions,
We all know people who every year make new year’s resolutions. We all know people who every year make the same new year’s resolutions. We even may belong to that group. Why can we never reach these goals? 

The answer to this question is not easy. For some of us having new year’s resolutions might be sort of a tradition: we set them every year (without even thinking too much about them) because everyone else does. Some of us are full of energy and good will in January therefore right at the beginning we work religiously on meeting our resolutions, but as time passes we are less and less enthusiastic about them. But why? Are our goals simply too ambitious or does lack of motivation hinder our success? 

Making a change is difficult but making many big changes at the same time is extremely difficult, thus maybe it is better to start with one or maximum of two small amendments to our life. So if we want to improve our diet, instead of avoiding junk food completely, let’s start with quitting only biscuits or crisps. This should be so much easier to achieve from one hand and from the other – once we are successful – it will motivate us to doing more.  

Organizing a support system might also be helpful in achieving our goal. So if we are, for instance, eliminating crisps from our diet, it is better to avoid the temptation and simply not to have any at home. Additionally, once we tell our family and friends about our resolution, not only will they not offer any crisps to us, but we may feel more obliged to stick to this plan as we want to avoid embarrassment of admitting to failure.

Once the goal is chosen, we have to set the start date for realizing the plan. Any day is good enough as long as it is realistic. Beginning our adventure with outdoor jogging in winter when it is cold and icy is not the best idea since we will probably very quickly start looking for excuses not to go outside. But when we do start, it is important to keep a record of how we do in realizing our plan. For instance, writing down daily or weekly in a calendar time spent on exercising will make us feel great and even more motivated when we do well. And when we don’t achieve the planned hours, we will be able to easily notice that, think about the reasons and adjust the workout plans accordingly. So if we were to, for example, workout 3 times per week in the evening in a gym but we end up going only once because we are too tired, going there in the morning or exercising at home will resolve that problem. 

When we accomplish our goals we will already feel wonderful but why not celebrate the success in a special way that will make us want to achieve even more? We can for instance reward ourselves with a small gift whenever we lose 2kg or reach planned hours of workout in a month. Obviously the reward shouldn’t undermine the achievements thus celebrating the first month without biscuits with a huge cake is not the best idea! 

However, after the celebration there is still a lot of hard work because we want to make sure that whatever we have achieved is a permanent change for life. It probably will not be easy but writing down how this change has improved our life and how great we feel about it will certainly help. And keeping on eliminating the tempting triggers (biscuits, crisps, easy excuses) is very important too.  

Having read this post, now you may think it is a few weeks too late. But I feel you have read it just in time. If you have already given up on fulfilling your new year’s resolutions as they seemed unachievable, hopefully after reading this post you will get back to them. Maybe you will adjust them so they are not that demanding, or maybe you will concentrate just on one goal remembering that small improvement is better than no improvement. And if you haven’t set your resolutions yet, now with this newly gained insight, it is going to be so much easier. 
And it really doesn’t matter the New Year was a few weeks ago because nobody said you have to wait for New Year to improve your life. 

Wednesday, 20 January 2016

Roasted Tomato Soup [vegan]


tomato soup, roasted tomato soup, tomato, recipe, recipes, healthy

Tomato soup is probably the second favorite soup in Poland, just after rosół (chicken broth). Typically, the Polish version is rather thin, there is even a joke that on Sunday you have rosół, on Monday you have tomato soup as it is just a question of adding tomato purée to the chicken broth. It is not quite true (but it may be if you are in a rush!) as you can make it with fresh tomatoes and it does taste great then.

But I have always preferred thicker soups. So I make mine with plenty of tomatoes but also red peppers, onions and garlic. Roasting all these vegetables adds a really intense flavor which is so important especially in winter when – unfortunately – many tomatoes don’t really have taste. After liquidizing the vegetables, you can adjust the amount of stock to your liking: add more if you prefer to serve the soup with pasta but if you – just like me – prefer a thick soup, add only 750ml of the stock. This way you will end up with beautiful, flavorsome and creamy result.

INGREDIENTS (for 4-6 portions):

1kg tomatoes, cut into quarters,
250g red peppers, deseeded and cut into quarters,
2 red onions, peeled and cut into quarters,
4 garlic cloves, peeled,
2 tbps olive oil,
1 tsp sugar,
salt and pepper,
750-1000ml vegetable stock.

METHOD:
  1. Preheat an oven to 190 degrees (170 for fan ovens).
  2. Put all the vegetables to a baking tin, pour the olive oil, sprinkle with salt, pepper and sugar, stir and put to the hot oven to roast for approx. 50 minutes.
  3. Liquidize the vegetables.
  4. Add the required amount of stock, bring to boil.
  5. The soup can be served with a drop of cream or/and pasta.
tomato soup, roasted tomato soup, tomato, recipe, recipes, healthy


Saturday, 16 January 2016

Lemon Meringue Roulade


lemon curd, lemon meringue roulade, lemon, lemon meringue, lemon roulade,recipe, recipes. meringue

I do realize that some people may think that I must have made a mistake in the above recipe name. I thought exactly the same when many years ago my mother-in-law mentioned that she was going to make it for dessert. Lemon meringue or lemon roulade sounded fine (and doable!) to me but Lemon Meringue Roulade? How was she even going to roll the fragile and easily crushable meringue into a roulade?!

This conundrum was solved pretty quickly when I found out this version was baked in a slightly higher temperature but for a much shorter time. As a result, instead of having a crispy and feather-like, you end up with a soft and cloud-like meringue that can be pretty easily rolled.

The filling for the roulade matches it perfectly: combination of whipped cream and lemon curd (bought or made from this recipe) makes it a wonderful, airy dessert. It feels very light but - let’s face it – it is pretty heavy in calories. So be aware as it is easy to have a lot of it: recently my husband had 1/3 of it in one go ;)

INGREDIENTS (for 8-10 portions):

6 egg whites,
160g caster sugar,
1 tsp white wine vinegar,
1 tsp potato starch,
0.5 tsp vanilla extract,
icing sugar for dusting,
250ml double cream,
3-5 tbsp lemon curd (for homemade version, check this recipe).

METHOD:
  1. Preheat an oven to 160 Celsius degrees (top and bottom heating).
  2. Line an approximately 25cm x 37cm baking tray with parchment paper.
  3. Whisk the egg whites till stiff; continue whisking and add 1 tbsp of sugar, beat for 10-20 seconds more and add another 1 tbsp of sugar, continue until you have used all the sugar.
  4. Beat in the vanilla extract, vinegar and potato starch.
  5. Spread in the prepared tin, put to the oven and bake for 20 minutes till golden.
  6. Remove from the oven and cool down for a few minutes.
  7. Whip the cream till stiff; stir in the lemon curd.
  8. Generously sprinkle with icing sugar a big piece of parchment paper (bigger than the baked meringue base) and carefully flip the meringue upside down.
  9. Gently peel off the paper and spread the lemon filling on top, leaving out a margin of approx. 5 cm on one of the longer sides.
  10. Using the paper to help you, roll the roulade carefully along the shorter side.
lemon curd, lemon meringue roulade, lemon, lemon meringue, lemon roulade,recipe, recipes. meringue


Thursday, 14 January 2016

Lemon Curd


lemon, lemon curd, recipe, recipes

Many years ago when I saw jars of lemon curd in an English shop for the first time, I had no idea what it was and how it could be used. This type of a preserve simply wasn’t known in Poland at that time. Later I learnt lemon curd was a popular ingredient for an afternoon tea in England served with scones or as a filing for pastries. I also found out from my mother-in-law another way of using it but I will write about it in my next post ;)

Years passed by and lemon curd is available in some shops in Poland now but a few weeks ago when I needed it, I couldn’t find it anywhere. So I decided to give it a go and make it myself. I did a little research, found many recipes and at the end combined a few of them to create one pretty simple and 100% successful formula.

INGREDIENTS (for approx. 350ml):

2 eggs,
2 egg yolks,
165g caster sugar,
2 lemons, zest and juice,
80g cold butter, cut into a few pieces.

METHOD:
  1. Take a heat-proof bowl and choose a saucepan that is the right size to securely put the bowl into it (there has to be a few cm gap between their bottoms).
  2. Pour water to the saucepan (a few cm) and bring to boil.
  3. Whisk the eggs, egg yolks and sugar in the bowl until the mixture is thick and pale.
  4. Stir in the lemon zest and juice.
  5. Put the bowl over the saucepan of boiling water, decrease the heat to medium and stir the mixture (at first often and after 3-4 minutes constantly) with a wooden spoon until it is thick (it will take approx. 5-7 minutes).
  6. Remove the bowl from the saucepan, add the butter, one piece at a time and stir the mixture till it is smooth.
  7. Strain through a sieve into a sterilized jar, cool down and put to a fridge.
  8. It can be kept in the fridge up to a week.
lemon, lemon curd, recipe, recipes


Friday, 8 January 2016

Cauliflower Soup with Pear and Gorgonzola [vegetarian]


soup, cauliflower, cauliflower soup, pear, gorgonzola

My passion for cooking extends also to reading recipes. When I read them, I try to imagine the taste of food prepared according to them and if I like it, sooner or later I test them out. This passion makes me buy more cookery books, find more recipes on the internet but also look for recipes everywhere: in all sorts of magazines or even promotional material in supermarkets.

The below soup recipe I found in a Waitrose (British supermarket) booklet. Straight away I liked “the image of the taste” in my mind and when I cooked the slightly changed version, I really did enjoy it. I also tested the soup on my friend who liked it so much that she took the leftovers back home with her.

INGREDIENTS (for 4 portions):

20g butter,
200g shallots, peeled and chopped,
1 stick celery, chopped,
2 Conference pears, peeled, cored and chopped,
1 cauliflower (weighing approx. 500g), broken into florets,
1 l vegetable stock,
60g Gorgonzola cheese (dolce), roughly chopped,
3 tbsp chopped parsley,
salt and pepper.

To garnish:
chopped walnuts, parsley and Gorgonzola cheese.

METHOD:
  1. In a big pot melt the butter; add the shallots and celery and cook on medium heat for 5 min.
  2. Add the pears and cauliflower, stir and pour in the stock; cook for approx. 15 minutes till the cauliflower is soft.
  3. Add the Gorgonzola and parsley, cook for 5 minutes longer.
  4. Blend the soup till smooth, adjust the seasoning and serve garnished with chopped walnuts, parsley and Gorgonzola.

soup, cauliflower, cauliflower soup, pear, gorgonzola