Friday 27 February 2015

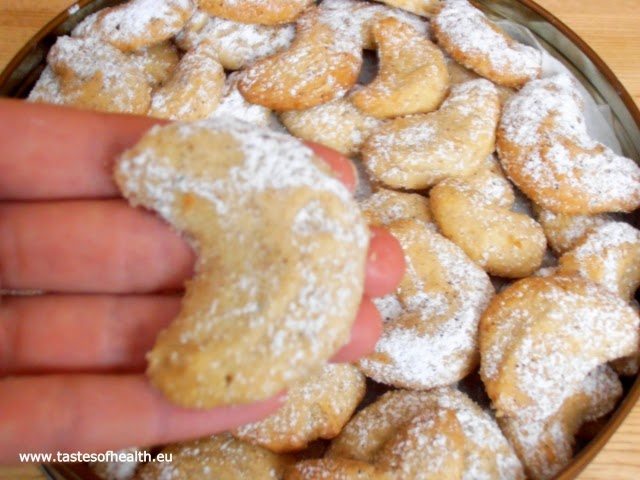
Walnut Biscuits (Nusskipferl)


biscuits, cookies, walnut, recipe, recipes


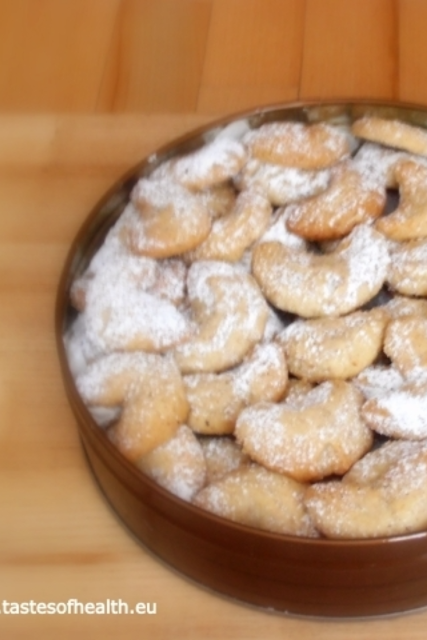
Walnut Biscuits are another example of delicious Austrian cookies. The preparation of the dough is very straightforward, it does take some time though to form the biscuits but only because the below recipe involves making loads of them!

When the dough is prepared, it should rest in the fridge for at least half an hour but it can stay there even overnight, as the dough is much easier to handle when it is cold and hard. Once you take a portion to roll a half-moon, try to do so as fast as you can because the dough gets soft very quickly and then it is difficult to form desired shapes. The biscuits are extremely soft when they are just taken out from the oven but they become harder as they cool down.

Because with this recipe you will make a lot of the Walnut Biscuits and also since after they are baked, they should cool down on the baking trays, the best idea would be to use at least 3 baking trays. That way when the first batch cools down and the second one is in the oven, you can make biscuits for the third tray. If you don’t have so many baking trays, it is not a problem; it will just take a bit longer to bake the cookies.  Using the best vanilla sugar available to coat them in, assures getting an almost heavenly experience - soft biscuits that melt in your mouth.

INGREDIENTS:
220g ground walnuts,
220g plain flour (plus extra for dusting),
110g caster sugar,
220g soft butter,
2 egg yolks.
icing sugar mixed with vanilla sugar for coating baked biscuits.

METHOD:
  1. In a food processor mix walnuts, flour and sugar.
  2. Add diced butter and whiz everything together; add the egg yolks, whiz again till all is combined.
  3. Transfer onto a plate dusted with flour, cover with cling film; leave it in a fridge for at least 30 minutes.
  4. Preheat an oven to 180 degrees (or 160 for fan oven); put baking paper into baking trays.
  5. Form biscuits: take a heaped teaspoon of the dough and roll it in a palm of your hand into a half-moon (approx. 3-4 cm diameter).
  6. Put biscuits on a baking tray, leave some space around them, bake for 10-12 minutes.
  7. Leave the baked biscuits on the tray till cool; coat them in icing and vanilla sugar.
biscuits, cookies, walnut


Thursday 26 February 2015

Cod with Spinach, Potatoes and Red Pepper Sauce


cod, spinach, potatoes, pepper


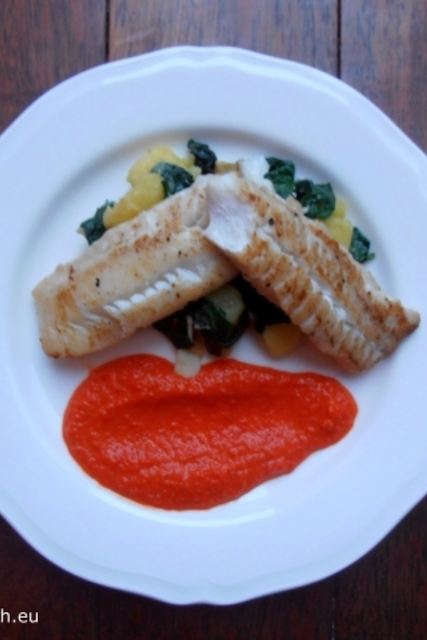
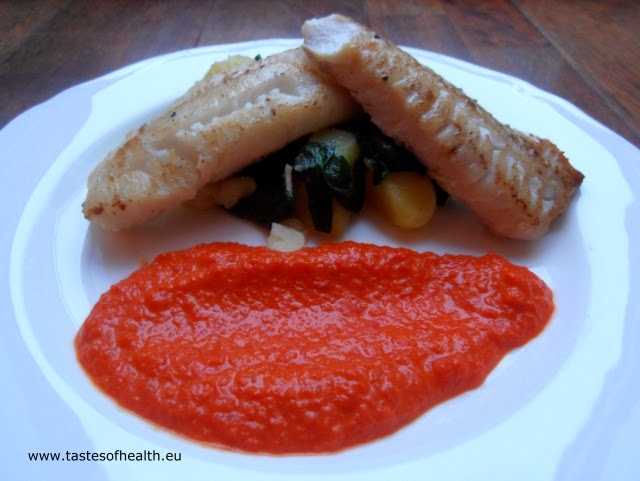
This dish is a great example of how easily something pretty simple can be elevated to a much higher level. The main components - boiled potatoes and fried cod - are good but let’s be honest – a bit simplistic not to say boring. But if you add to the potatoes spinach that has been quickly fried with garlic and you serve it all with a portion of red pepper sauce, you will get a wonderful experience not only for your taste buds but also for your eyes.

This meal apart from being tasty and looking good on a plate is also pretty healthy. It contains spinach – one of the most nutrient dense types of food and cod – an excellent source of Vitamin B12, Iodine, Selenium, Phosphorus and of course low-calorie proteins. And if you would like to make this dish even healthier, you can bake the cod in an oven instead of frying it.

INGREDIENTS (for 4 portions):
3 red peppers,
600g potatoes, peeled and cut into 4 cm pieces,
2 tbsp double cream (preferably thick one),
2 tbsp olive oil,
2 tbsp butter,
2 crushed garlic cloves,
250g spinach,
4 fillets of cod, skinless and boneless, each weighing 100-150g,
Salt and pepper.

METHOD:
  1. Preheat a grill in an oven.
  2. Cut the peppers into quarters, discard the insides, place them on a baking tray (skin side up) and put under the hot grill until the skin is black and blistered (it will take about 10-15 minutes – the time depends on a grill).
  3. When done, put the peppers to a plastic bag, seal it and leave for at least 10 minutes (this will make it easier to peel the skin off).
  4. Peel the peppers and liquidise them in a food processor or blender.
  5. Transfer to a small pot and if the sauce is too runny, reduce it. When the pepper sauce has consistency to your liking, add the cream and seasoning.
  6. Boil the potatoes in salted water till cooked through (cooking time will vary as it depends on a type of potatoes).
  7. In a big frying pan gently warm up 1 tbsp of olive oil, fry the garlic quickly just till it releases its aroma, add the spinach and fry it until wilted.
  8. In a frying pan heat 1 tbsp of olive oil and 1 tbsp of butter, add the seasoned fish and fry for 2-3 minutes on each side till golden and cooked through.
  9. Add to the cooked potatoes 1 tbsp of butter and the wilted spinach, check the seasoning; reheat the pepper sauce if not hot enough.
  10. On each plate put a portion of potatoes mixed with the spinach, place the fish on top and the sauce on the side.


cod, spinach, potatoes, pepper

Friday 20 February 2015

Quinoa Chocolate Cake [gluten free]


quinoa, cake, chocolate, gluten free


When I came across a cake made of quinoa, I couldn’t imagine it would be so good as I had only used it previously for savoury dishes. I could understand using millet: sometimes we do have millet with fruit and honey for breakfast, I even bake a tart with millet. But a cake with quinoa?!

I was so curious that I simply decided to give it a try. The result was surprising and delicious: the cake was very moist and rich and you couldn’t taste the quinoa. It only gave a slight “bite” to the cake but this was in truth an extra value added to its texture.

If a thought of the wonderful taste of this cake hasn’t convinced you yet to bake it, maybe its healthiness will: it contains a super grain but it doesn’t include any flour or butter (I replaced it with healthy rapeseed oil). So what can be better than a piece of an (almost) guilt-free chocolate cake?

INGREDIENTS (for 8-10 portions):

130g quinoa,
250ml water,
dash of olive oil,
80ml milk,
4 eggs,
1tsp vanilla extract,
150ml rapeseed oil,
175g Demerara sugar,
85g cocoa powder,
1.5tsp baking powder,
0.5 tsp baking soda,
0.5 tsp salt.

Icing:
100g dark chocolate
100g white chocolate
6 tbsp milk,
optionally 0.5 tsp beetroot juice (or a few drops of pink food colorant)

METHOD:
  1. Prepare the quinoa: put it to a fine mesh strainer, rinse it under running cold water rubbing the seeds with each other with your fingers (for at least 1 minute) and drain well. Heat a drizzle of olive oil in a pot over a medium heat and fry the drained quinoa for about 1 minute till the rest of water evaporates. Add water, 0.25 tsp salt and bring to a boil. Lower the heat and cook covered for approx. 15 minutes. Take it out from the heat and let it rest covered for 5 minutes more. Fluff the quinoa with a fork. The quinoa has to be dry, in case there is still some water left, transfer it to a strainer and let it drain completely.
  2. Preheat an oven to 170 Celsius degrees (fan oven).
  3. Grease a 23cm loose-bottom cake tin with oil and line it with baking paper.
  4. In a food processor combine together milk, eggs and vanilla extract; add oil and cooked quinoa, whizz again until smooth.
  5. Sieve the cocoa, baking powder and baking soda to a bowl; mix it with the sugar and salt, add the quinoa mixture and stir it well.
  6. Pour the mixture to the tin and put to the hot oven. Bake for 40 minutes.
  7. Make the icing: melt each type of chocolate separately with 3 tbsp of milk in a heatproof bowl over a pan of boiling water (if you would like to get pink icing add the beetroot juice or the colorant to the white chocolate).
  8. When the cake is baked, take it out from the oven, leave it in the tin for 10 min. Afterwards put it on a plate and cool. Spread the dark icing and then pour the pink (white) icing in a decorative way.

Based on: Decadent Chocolate Cake by Mel’s Kitchen Cafe.


quinoa, cake, chocolate, gluten free

Friday 13 February 2015

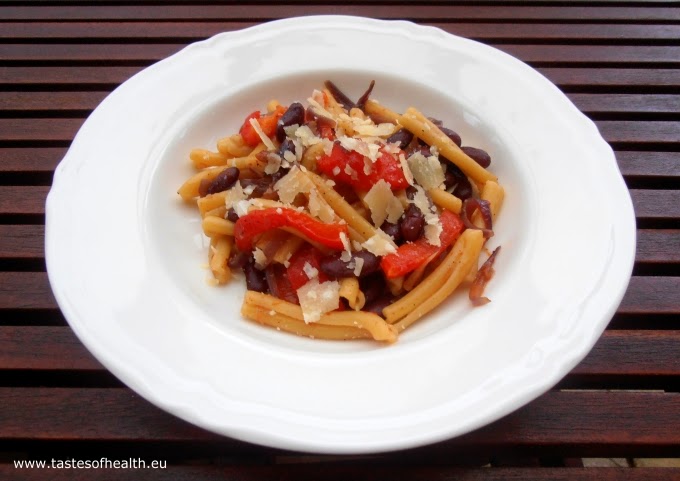
3 Shades of Red Pasta with Peppers, Onions and Beans [vegetarian]


pasta, pepper, beans, vegetarian, onions, recipe, recipes, healthy


I don’t think you can ever get bored with pasta (at least I can’t!). There are so many sauces you can serve it with and so many shapes you can choose from. My favourite pasta shapes are orecchiette and casarecce – I like them not only because of their form but also because when I bite into them, they seem to me to be firmer than other types. But in truth all types of pasta will be firm, if they are cooked al dente (from Italian “to the tooth”). Majority of packets give instructions on how long you should cook pasta to have it al dente but if not, then in general the normal cooking time should be shortened by 2 minutes. 

Al dente pasta not only gives a better texture to dishes but it is also healthier: firmer pasta has a lower Glycemic Index than the softer or overcooked one. And lower GI ensures gradual rise in blood sugar which helps keeping under control glucose and lipid levels (important for diabetes) as well as hunger (important for everybody who wants to maintain a healthy weight).

So how to have healthy pasta dish? – cook it the right way. And how to have even healthier pasta? Serve it with loads of vegetables like for example in the below recipe, where I combined it with three red vegetables: peppers, onions and beans to get a delicious, complete vegetarian dish.

INGREDIENTS (4 portions):

3 red peppers, cut into quarters (seeds and stalks removed),
3 red onions, sliced,
3 tbsp olive oil,
0.5 tsp sugar,
300g pasta shapes,
420g tin of red beans, drained,
salt and pepper,
grated Parmesan cheese to serve.

METHOD:
  1. Preheat a grill in an oven.
  2. Place the quarters of the peppers on a baking tray (skin side up) and put under the hot grill until the skin is black and blistered (it will take about 10-15 minutes – the time depends on a grill).
  3. When done, put the peppers to a plastic bag, seal it and leave for at least 10 minutes (this will make it easier to peel the skin off).
  4. Heat the olive oil in a big frying pan, add the sliced onions and fry them on a medium heat for 8-10 minutes until soft and caramelised (but not burned!). Half way through add sugar and seasoning.
  5. Cook the pasta al dente.
  6. Peel off the peppers, cut them into slices and add to the caramelised onions together with the red beans, heat up.
  7. Drain the pasta but save half a cup of the pasta cooking water.
  8. Add the pasta to the frying pan, stir, check seasoning. If the dish is very dry, you may add a few tablespoons of the saved pasta cooking water.
  9. Serve sprinkled with extra olive oil and grated Parmesan.

pasta, pepper, beans, vegetarian


Tuesday 10 February 2015

2 in 1 Valentine’s Cake [gluten free]


cake, Valentine's day, chocolate, raspberries, gluten free, recipe, recipes


Right from the beginning I knew exactly what sort of a cake I wanted to make for the Valentine’s Day: it had to be a combination of chocolate and raspberries, it also had to be rich and heavy from one hand and light and airy from the other. Why such a combination? – Chocolate is supposed to be an aphrodisiac so it is perfect for such an occasion, raspberries are red and this is a colour of love. As far as textures are concerned, I was certain that - as per “the opposites attract” saying – these characteristics will work also for a cake!

I obviously wanted the cake to be of a heart shape but unfortunately the form I used was a bit too shallow (only 3.5cm high) so I was able to use only half of the raspberry mousse. Of course it wasn't wasted as even eaten by itself was delicious J. But I think it would be preferable to use the whole amount on top of the chocolate base, even if you were to make a sacrifice and not have the heart shape. At least this is what I am going to do next time to enjoy this Valentine’s Cake to the fullest.

INGREDIENTS (for 10-12 portions):

Chocolate base:
100g dark chocolate, broken into pieces,
2 tbsp rum,
90g butter in a room temperature,
120g sugar,
3 eggs, separated,
a pinch of salt,
50g ground almonds,
35g corn flour (or all purpose flour, if you don’t have to have a gluten-free cake),

Raspberry mousse:
500g raspberries (if frozen than they should be defrosted),
2 tbsp vanilla sugar,
6 sheets of gelatine (or 1 tbsp of gelatine powder),
500g double cream,
80g icing sugar,
extra raspberries for decoration.

METHOD:
  1. Put the chocolate and the rum to a bowl that is placed on top of a pan with barely simmering water; stir occasionally and melt.
  2. While the chocolate is cooling down, beat with an electric mixer the butter with half of the sugar till it is nice and creamy.
  3. Add the egg yolks; beat some more.
  4. Preheat an oven to 180 degrees and grease a baking tin. I used a silicon 29cm heart shaped form but it can be replaced by a 20-22cm diameter round tin with a removable bottom. If you are using the round tin, additionally put a disc of baking paper on its bottom.
  5. Whisk the egg whites with the salt until soft peaks form; add the rest of sugar and whisk till stiff.
  6. Add to the butter mixture the cooled down melted chocolate and the ground almonds, stir well.
  7. Now add 1 tbsp of whisked egg whites and 1 tbsp of the flour, stir gently. Repeat till you have used all the flour; at the end add the rest of the whisked egg whites and mix gently again.
  8. Pour the batter to the prepared form, put it to the oven and bake for 20 minutes.
  9. Put the raspberries to a blender and liquidise them; then press through a fine sieve to eliminate the pits and mix with the vanilla sugar.
  10. Prepare the gelatine as per its packet instruction.
  11. Whisk the double cream until stiff, slowly add the sugar.
  12. Add a few tablespoons of the liquidised raspberries to the pan with dissolved gelatine, stir and then add the rest of the raspberries.
  13. Combine the cream with the raspberries.
  14. Keep the baked base in the tin and when it is cold, pour the raspberry mousse to the tin, smooth the top and put the cake to the fridge for a few hours, preferably overnight.
  15. When set, decorate with raspberries.
cake, Valentine's day, chocolate, raspberries, gluten free,


Friday 6 February 2015

Dhal with Spinach and Green Peas [vegetarian/vegan]


dhal, dal, lentils, spinach, green pea, vegetarian, vegan,


It is thanks to Dhal that I started to appreciate lentils. I used to find them quite bland and uninteresting but when I tried them combined with spices like e.g. turmeric, paprika, ginger or chilli, I realized how tasty and appealing lentils could be.

Tarka Dhal was the first dish of this kind I had many years ago and I simply loved it. And I still do when it is on a table at my home or in a restaurant along with kormas or baltis: moving from one taste to another is just such a wonderful experience. But what to do if there is not enough time to cook more than one dish? Then, I guess, we can cook dhal with some extras like for example spinach and green peas as in the recipe below.

INGREDIENTS (for 4 portions):
2 shallots, thinly chopped,
1 tbsp olive oil,
4 garlic cloves, thinly cut,
1 chilli pepper, thinly chopped,
2 tsp grated ginger,
0.5 tsp turmeric,
1 tsp mild paprika,
250g red lentils, rinsed,
600 ml water,
6 tomatoes on the vine, peeled and chopped,
100g frozen green peas,
2 handfuls of spinach, roughly chopped,
Juice from 0.5 lime,
Salt and pepper

METHOD:
  1. On a medium heat warm up the olive oil, add the chopped shallots and fry for 1 minute.
  2. Add the garlic, ginger and chilli; fry stirring occasionally for 3-4 minutes.  Be careful with adding chilli as smaller peppers are spicier than bigger ones. So you may want to add less at the beginning and - depending on how spicy you would like your dish to be – add more later.
  3. Add turmeric and paprika fry for 2 minutes more.
  4. Stir in the lentils, add water, bring to boil and cook for 30 minutes, stirring from time to time to make sure the Dhal doesn't burn. If necessary, add more water.
  5. Add the green peas, lime juice and seasoning and at the end stir in the spinach.


dhal, dal, lentils, spinach, green pea, vegetarian, vegan,


Thursday 5 February 2015

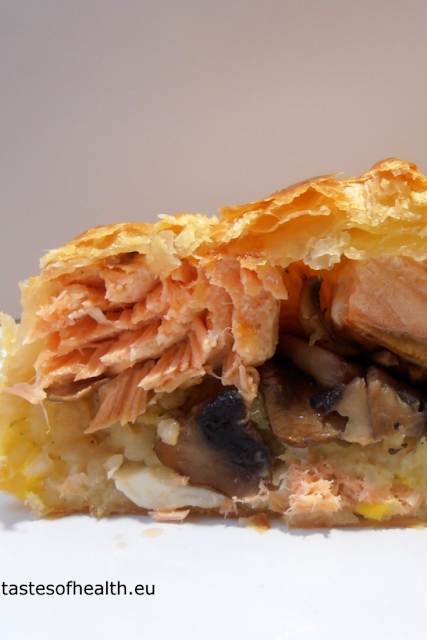
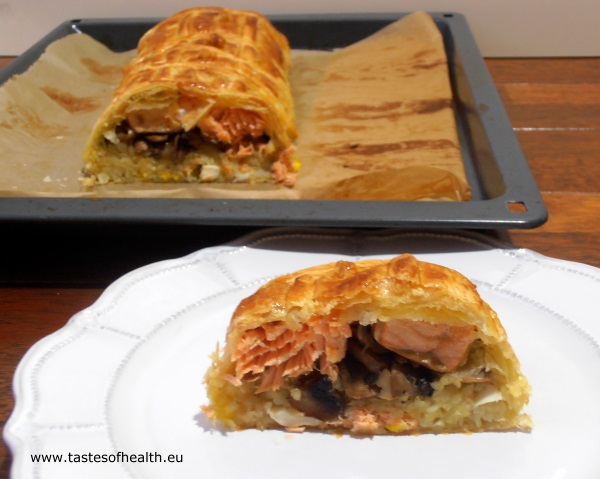
3 Layers Salmon Strudel


mushrooms, salmon, strudel, rice, eggs, recipe, recipes, puff pastry


We all probably have some dishes we only cook for special occasions or celebrations: a special birthday cake or a stuffed turkey. For quite a few years I made this 3 Layered Salmon Strudel exclusively for Christmas Eve. But then I thought: why to limit having this wonderful dish to one and only one evening per year? And I started making it more often, as apart from being delicious, it is also very convenient: it can be prepared in advance just like Inge’s Vegetable Strudel  

If you are not sure how to roll a strudel in a way that there is not too much pastry on its endings, please watch the short video.

INGREDIENTS (for 6 portions):
150g rice,
475ml vegetable stock,
1 onion, chopped,
1.5 tbsp olive oil,
3 eggs,
250g mushrooms, sliced,
1 tbsp butter,
450g salmon, cut into 4-5cm pieces,
0.5 tsp mild paprika,
2 tbsp dry white wine (optionally),
salt and pepper.
500g puff pastry.

METHOD:

  1. Heat 1 tbsp of olive oil in a pot, add the chopped onion and fry on a low heat for 5 minutes.
  2. Add the rice, increase the heat and fry, stirring for 1 minute, then add 350 ml of the vegetable stock and cook for 15-20 minutes (depending on the type of rice), stirring occasionally. If the rice absorbs all the stock but it is not soft yet, add more stock, a bit at a time as at the end it has to be sticky but not wet.
  3. Boil 2 eggs for 8 minutes; when they are cold enough to handle, peel them off and chop.
  4. Melt the butter in a frying pan, add the sliced mushrooms and fry till golden, season.
  5. Season the salmon and sprinkle it with paprika.
  6. Heat 0.5 tbsp of olive oil in a frying pan, add the salmon and fry for 2 minutes on each side. If you are using the white wine, add it to the pan after the salmon.
  7. Preheat the oven to 220 Celsius degrees.
  8. Mix the cold cooked rice with the chopped egg, season.
  9. Put greaseproof paper on a baking tray and put the puff pastry on it. In the middle of a half of the pastry that is closest to you, spread the rice mixed with the chopped egg to a rectangle about 7-10cm width, leaving approx. 3-5 cm on the shorter sides and 5-7 cm of the longer side (please watch the video for details).
  10. On top of the rice put the fried mushrooms and then – pieces of salmon.
  11. Rise up onto the filling the shorter sides of the pastry and the long side that is close to you. Press it gently so it stays on the filing and brush the egg on it. Now move the other half of the pastry gently on top of the filling and seal the strudel. Brush the whole strudel with the beaten egg.
  12. Bake it for 10 minutes in 220 Celsius degrees (200 fan oven), then lower the temperature to 190 (170 fan oven) and bake for another 20 minutes till golden. 
  13. Take it out from the oven and let it cool for at least 15 minutes before you cut it into slices.
mushrooms, salmon, strudel, rice, eggs, recipe, recipes, puff pastry